Six months ago we published a blog post describing ‘Warcodes’ a novel attack vector against industrial barcode readers. It included the following warning in the conclusion:
“Also, according to IOActive’s experience, it is likely that similar issues affect other barcode manufacturers.”
The same warning still applies at the time of writing this post, so I am afraid that we will have a ‘Warcodes III’ sooner rather than later.
Also, I would like to clarify that, as opposed to previously published research on barcode readers, we are directly attacking the barcode reader device. This basically means that for our attacks to work we do not take the user terminal (a PC or any other device) connected to the target barcode reader into account.
In the previous blog post, we focused on industrial barcode readers used in the baggage handling systems deployed at a significant number of international airports. The context in this case does not change very much from the previous one, we are still analyzing threats to smart airports by looking for potential security risks in the devices that comprise the most critical systems within modern airport facilities. To identify those systems, we again used the ranking that appeared in this ENISA paper on securing smart airports.
This time we targeted boarding gate readers used as part of the passenger boarding and flow control.
DESKO
Please note that after 3 months DESKO stopped responding to our requests so unfortunately we are not aware of any workaround.
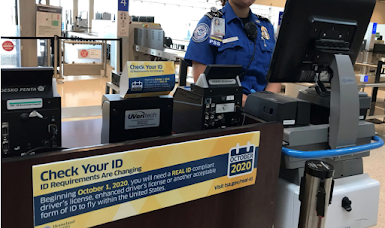
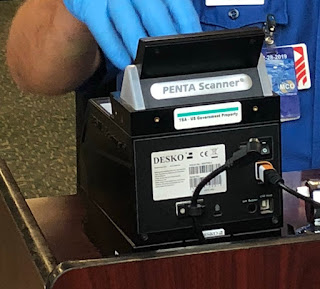
DESKO products are found in most international airports around the world. For instance, while going through a security checkpoint you may have noticed that the TSA uses DESKO’s PENTA Scanner®.
Unfortunately, I couldn’t find one of those devices publicly available so if anyone out there is willing to help me access a PENTA Scanner, just ping me.
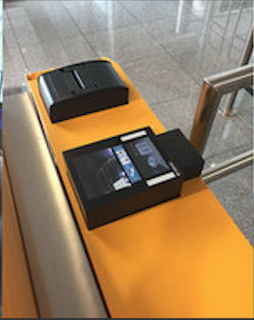
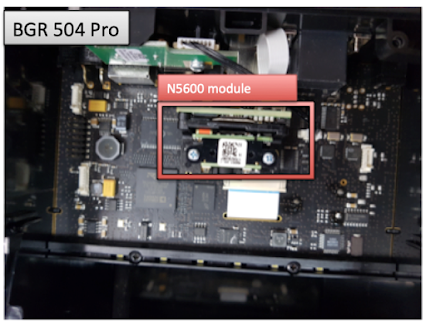
However, I managed to buy a couple of BCR/BGR 504 pro devices, which are pretty common at boarding gates and security checkpoints at international airports such as Munich (Germany), San Francisco (US), Heathrow (UK) or Mumbai (IN).
BGR 504 at Mumbai Airport (India) – Image from https://livefromalounge.com
BGR 504 at Munich Airport (Germany)
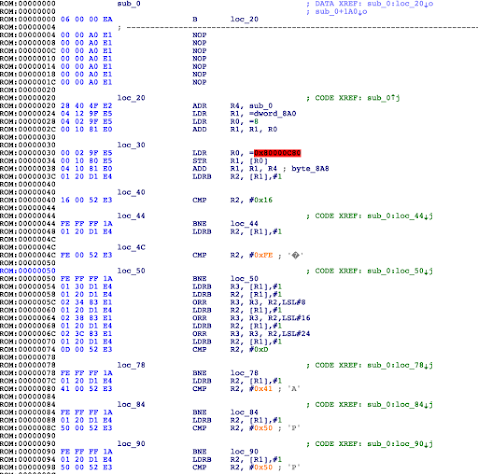
Hardware Analysis
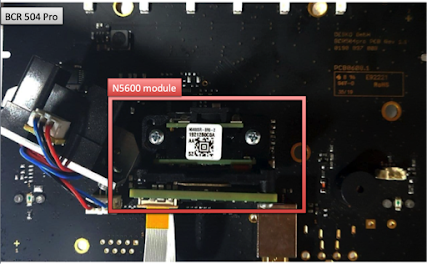
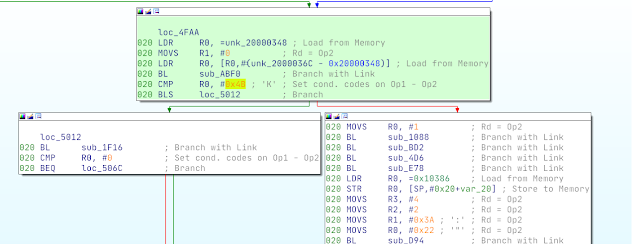
At first glance, it is obvious that the BGR 504 pro is a much more complex device than the BCR 504 pro; however, they both use the same imaging engine, an OEM barcode reading engine manufactured by Honeywell: the N56xx family.
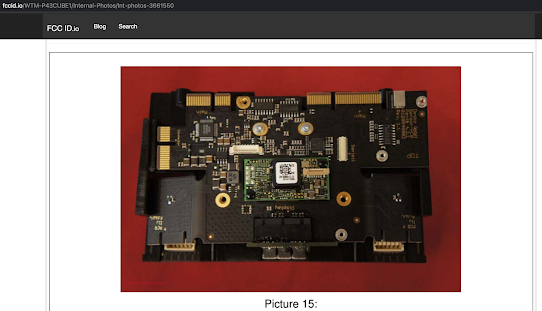
According to the FCCID documents, the Desko Penta Scanner Cube seems to be using the same n56XX module.
According to the document we can “create and print programming bar codes” pretty much the same way as in the SICK scenario, so the EZConfig-Scanning software is certainly an interesting target to dig deeper into and explore all those functionalities.
Ok, there we go. This basically confirms that we can control the N5600 via custom programming barcodes, but there are some security settings that may prevent this from working. Unfortunately, those security settings are not publicly available, so it seems like reverse engineering is, once again, the only path we can take to satisfy our curiosity.
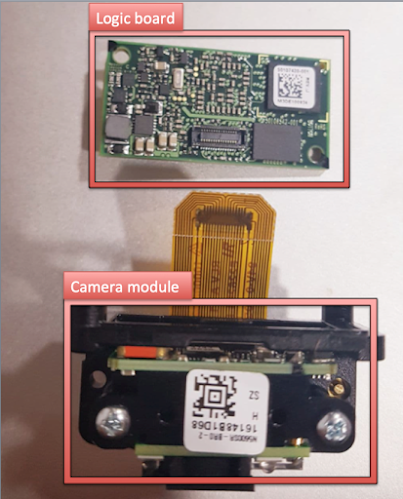
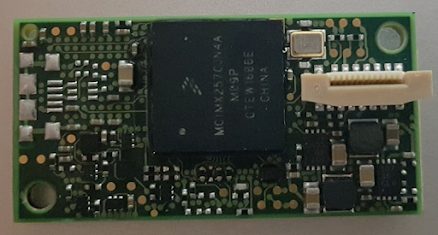
The N56xx module is basically comprised of a camera module and logic board.
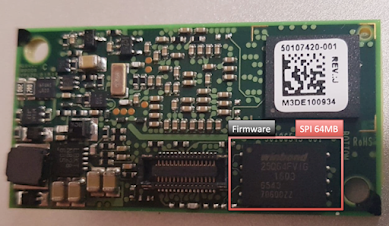
We have already seen that it is possible to configure the module with custom settings, but it is also possible to develop custom plugins for this module using the TotalFreedom SDK. There is even a marketplace for commercial plugins. Taking this into account, the Winbond SPI flash memory may hold interesting data; hopefully, the firmware as well.
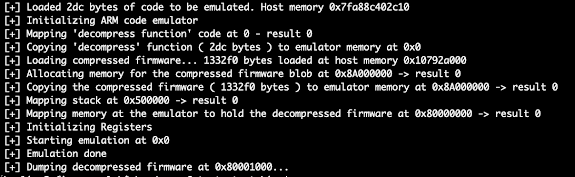
So instead of dumping the memory, I just sniffed the SPI bus during a regular boot using a SALEAE logic analyzer.
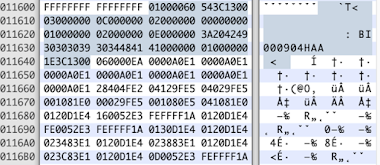
It was possible to grab the firmware from the captured data. I directly exported the CSV data from the SALEAE session and wrote the following program to extract the contents.
Firmware analysis
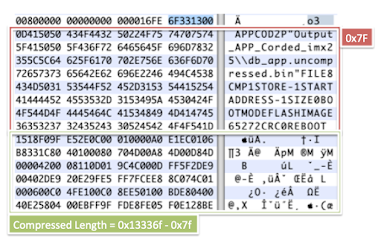
Right after the highlighted header, we find the code for a loader that decompresses the main application.
After the loader comes the application header, and then finally, the compressed application.
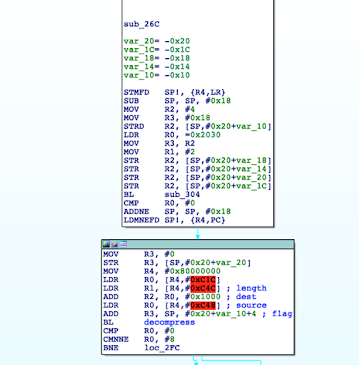
Honestly, I didn’t spend too much time trying to understand the decompression algorithm; it looks like some kind of RLE, but I moved directly to emulating it using the Unicorn engine. There are just few requirements we need to comply with in order to emulate this function:
We need to understand the context where the decompression function is executed and replicate it within our Unicorn-based emulator program. We need to set the context of the function as if we were the loader. The function is expecting four parameters:
R0 – Source (compressed data)
R1 – Length (compressed length)
R2 – Destination
R3 – Flag
We need to save the code for the ‘decompress’ function (732 bytes)
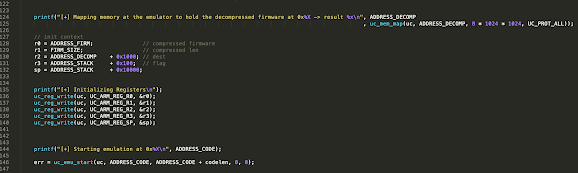
In the Unicorn engine program, we have to create the memory mappings, load the code to be emulated (decompress.bin), and set the registers accordingly, before invoking the function to be emulated. C source code available here.
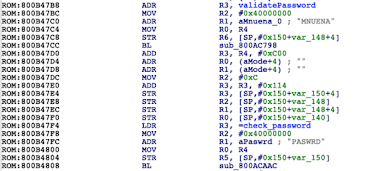
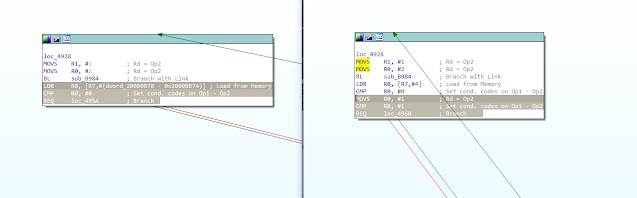
Back to those ‘confidential’ security settings, firmware analysis revealed the logic behind them.
The ‘MNUENA’ command is used to decide whether or not the N56xx module will accept programming barcodes. Basically, executing MNUENA0 disables menu commands through programming barcodes and executing MNUENA1 forces the device to start accepting them again.
However, it appears that someone considered that once you deploy one of these modules, it is not a good idea to let just anyone send menu commands through programming barcodes. By reverse engineering the firmware, I noticed that Honeywell implemented a single security boundary: a ‘PASSWORD’ field in the working config. It can be configured through ‘PASWRD’ command in order to require a password when attempting to enable menu commands with ‘MNUENA1’.
‘validatePassword’ checks whether the password entered via the programming barcode is the same as the one that was configured, and ‘check_password’ checks whether the format of the password is acceptable when it is set.
Obviously, this approach may have a significant caveat: when configured, the value of that ‘PASWRD’ will probably be the same for all N56xx modules. Therefore, if you have physical access to one, for instance, by buying a decommissioned device (like I did), it is possible to access the password.
A further analysis revealed that you do not even need physical access to dump flash memory, as I also found undocumented commands that can be sent through specially crafted USB (or Serial when Desko VCOM is installed) requests. Their names are pretty self-explanatory but are summed up as follows:
DUMPMEMORY: Allows dumping arbitrary chunks of memory
PEEK: Allows reading memory contents from arbitrary addresses
POKE: Allows writing attacker-controlled values to arbitrary addresses
You can use the following PoC to communicate with a N56xx module and send the aforementioned commands via USB.
In the DESKO case, the ‘PASWRD’ field has not been configured, so anyone presenting the following barcode to the device will enable menu commands through programming barcodes, allowing them to disrupt the normal functioning of the device.
Conclusion
The attack vector described in this blog post can be exploited in various ways across multiple industries, as the Honeywell N56xx family is an OEM device that is actively deployed in different sectors. These issues can be leveraged to backdoor and take control of these devices.
We recommend all barcode reader manufacturers take a proactive approach and assess the security posture of their products against this type of attack, as the trend we are observing is worrisome.
Disclosure Timeline
2020-08-12 – Initial contact through DESKO’s web support form.
2020-08-12 – Automatic reply from DESKO.
2020-08-17 – DESKO support staff asks for additional information about the issue.
2020-08-19 – IOActive shares the initial advisory describing the issue with DESKO.
2020-08-20 – DESKO support staff acknowledge the report and mention they will share it with their Research & Development team.
2020-09-23 – DESKO states they are in contact with the N5600 manufacturer in order to address the issue.
2020-10-26 – IOActive asks for a status update; no response
2020-11-23 – IOActive asks whether DESKO has any plans to share a statement about this security issue; no response.
Please note that after 3 months DESKO stopped responding to our requests so unfortunately we are not aware of any workaround.
INSIGHTS, RESEARCH | November 11, 2020
CVE-2020-16877: Exploiting Microsoft Store Games
By
Donato Ferrante
TL;DR
This blog post describes a privilege escalation issue in Windows (CVE-2020-16877) I reported to Microsoft back in June, which was patched in October. This issue allows an attacker to exploit Windows via videogames by directly targeting how Windows handles Microsoft Store games. This issue could be exploited to elevate privileges from a standard user account to Local System on Windows 10.
Introduction
Back in June, a certain announcement caught my attention – Microsoft just added support for mods for various games as part of its gaming subsystem. My growing curiosity lead me to explore this new Windows feature and find an implementation flaw that could be abused to conduct privilege escalation attacks.
I have put together this blog post using the many Post-it notes left stuck around my monitors, detailing a long night spent playing around with this new Windows feature.
Before we start playing with this feature, let me provide you with some background on Windows apps and game mods. If you are familiar with these concepts, please feel free to skip over the next section.
Windows Gaming and Mods
If you are not too familiar with videogames, a mod (short for “modification”) is an alteration made by players or fans of a videogame, that changes one or more aspects of a videogame, such as how it looks or behaves. Mods range from small changes and tweaks to complete overhauls, which can make a game more interesting to play.
In general, Microsoft Store games are Universal Windows Platform (UWP) apps deployed on Windows as Windows apps.
According to Microsoft’s documentation, a UWP app is:
Secure: UWP apps declare which device resources and data they access. The user must authorize that access. UWP apps use a manifest to specify the capabilities that are needed, such as access to the microphone, location, Webcam, USB devices, files, and so on.
Able to use a common API on all devices that run Windows 10.
Available from the Microsoft Store on all devices that run on Windows 10.
Able to be installed and uninstalled without risk to the machine or incurring “machine rot”.
One can think of a UWP app as a sandboxed application, which defines its capabilities (e.g. filesystem access, network access, and so on) in the Manifest part of the application package (Appx).
Appx is the file format used to distribute and install apps on Windows 10, Xbox One, HoloLens, and Windows 10 IoT Core. Unlike legacy desktop apps, Appx is the only installation system allowed for UWP apps.
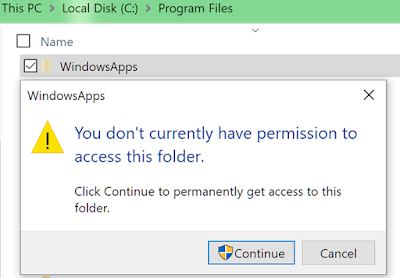
Windows apps are stored in a special “hidden” directory (“C:\Program Files\WindowsApps“) on the system that has strict access rules, preventing any sort of game mods or standard user interaction:
The following images shows the permissions for this directory:
In the past, given the lack of mod support for Microsoft Store games, players have been looking for workarounds to mod their favorite games (i.e. Minecraft – Microsoft Store edition). For example, in order to perform DLL injection on UWP apps, the ALL APPLICATION PACKAGES (S-1-15-2-1) group should have had R+X permissions on the DLL being injected into the Windows app.
Now that we have a basic idea of the Windows apps ecosystem and game mods, we are ready to jump into the fun part.
Game On!
Before installing the game on my system, I took a step back and considered how Microsoft might implement this feature and came up with two possible ways. My two guesses were:
A new subdirectory within the WindowsApps directory that was accessible to standard users.
A separate directory placed in a (standard) user-accessible directory.
So, I performed an additional step and did a simple search on my main drive for “*WindowsApps*” and got the following result:
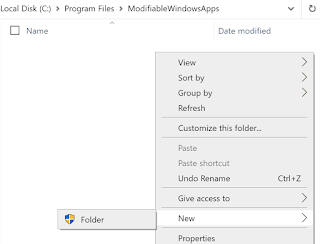
It appears that in order to allow games to support mods, Windows created a new directory “C:\Program Files\ModifiableWindowsApps“, which as the name suggests, should host Windows apps that could be modified. Interesting.
I wanted to check the permissions on this directory as well as its contents, but unfortunately, I didn’t have any content in it yet. However, I could at least access it without an admin prompt, but couldn’t do much in it…
Permissions on C:\Program Files\ModifiableWindowsApps:
I did a quick online search for references to this directory and found the following bits:
References to the ModifiableWindowsApps directory could be found in the Microsoft documentation for desktop6:MutablePackageDirectory (dated 04/19/2019), which states this directory, “specifies a folder under the %ProgramFiles%\ModifiableWindowsApps path where the contents of your desktop application’s install folder are projected so that users can modify the installation files (for example, to install mods).”
The documentation for desktop6:MutablePackageDirectories (dated 04/19/2019) states this directory, “enables your desktop application to specify one or more folders where users can modify the installation files for your application (for example, to install mods).”
And most importantly, “this element is currently intended to be used only by certain types of desktop PC games that are published by Microsoft and our partners. It requires the modifiableApp restricted capability“.
This tells us that this feature is restricted to only certain games that need to be vetted and approved by Microsoft, in order for the game to be allowed to specify the modifiableApp capability in the manifest, and therefore allow mods.
Recap Time
Let’s recap what we know so far:
Windows is allowing a number of Microsoft Store games to be modifiable.
This is achieved by allowing certain game developers to publish UWP games on the Store using a restricted capability (modifiableApp).
Among other things, the modifiableApp capability allows Microsoft Store games to rely on the Windows mod support and a bunch of new APIs.
These modifiable Windows apps can specify the directories where their modifiable data is stored via MutablePackageDirectory and MutablePackageDirectories.
Back To The Action
At this point, in order to proceed with my exploration, I had to find a list of games with mod support available on the Microsoft Store, and pick a game to play with. Luckily enough, the Microsoft article about mod support for Microsoft Store games had this list ready for me:
DiRT Rally 2.0
Farming Simulator 17
FTL: Faster Than Light
Into The Breach
MudRunner
I decided to go for Faster Than Light:
To confirm my understanding of the Windows apps’ modding approach, I took a quick peek at the game manifest to check and confirm the presence of the “special” capability (modifiableApp):
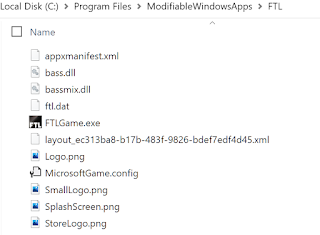
And to confirm the location of the game directory where the game data would be deployed, I checked the ModifiableWindowsApps directory after installing the game, and “FTL” would be the MutablePackageDirectory:
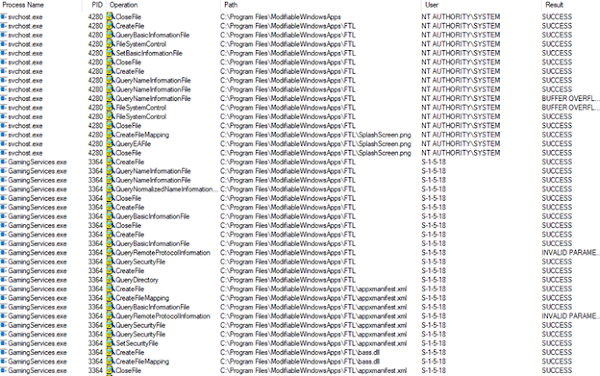
With this information, I decided to go ahead and install the game again as a standard user, and monitor the installation process with ProcMon:
ProcMon provided me with the following information about installing games with mod support from the Microsoft Store:
There were two main processes doing the heavy lifting:
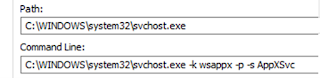
svchost (running as NT AUTHORITY\SYSTEM), specifically:
These processes performed interesting file actions without impersonating a low-privileged user.
At this point I was very intrigued by this installation mechanism and decided to spend a bit more time on this, but not before having yet another late-night espresso.
Houston, We Got A Problem
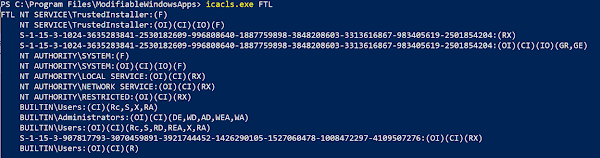
The ModifiableWindowsApps directory, storing Windows games, does not allow (by default) standard users to fiddle with the installation directory or its contents:
One of the reasons why Microsoft may want to restrict access to the game directory (and its parent directory) is to prevent standard users from hijacking the installation process and placing game data into an unwanted directory. How? For example, by relying on symbolic links.
Specifically, on Windows it is possible to create symbolic links via:
Hard Links – A hard link is the filesystem representation of a file by which more than one path references a single file in the same volume.
Junctions – A junction (also called a soft link) differs from a hard link in that the storage objects it references are separate directories, and a junction can link directories located on different local volumes on the same computer.
Object Manager Symbolic Links – a filesystem-like structure, which is used to hold named resources, such as devices and events, that also supports symbolic links.
If you would like to know more about symbolic links, please refer to the amazing work from James Forshaw (@tiraniddo) on this topic (i.e. A Link To The Past).
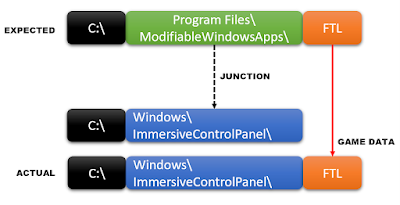
If I were able to gain write access to the ModifiableWindowsApps directory, I could try to redirect the game installation to target an arbitrary directory on the system, including a directory a standard user would not have access to, since the installation process(es) run as a high-privileged user, as shown earlier.
Under the assumption I could create the initial junction (for the ModifiableWindowsApps directory itself), the following workflow shows a possible way to hijack the installer to an arbitrary directory (i.e. into “C:\Windows\ImmersiveControlPanel“), bypassing access restriction:
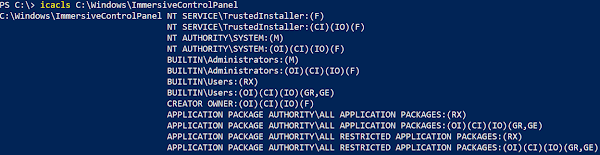
Permissions for C:\Windows\ImmersiveControlPanel:
Unfortunately, to be able to set up any symbolic link, a standard user would need to have write access to ModifiableWindowsApps or any of its subdirectories.
This was not possible since the ModifiableWindowsApps could not be replaced (as this was already part of the system) and there were strict access rules in place to protect this directory and its content (i.e. the game directory “FTL“).
Is it game over? Well not just yet…
And Yet It Moves
All I needed to find was a way to “lift” the ModifiableWindowsApps directory and place it somewhere else on the system where I have access, at least until this relocation has completed.
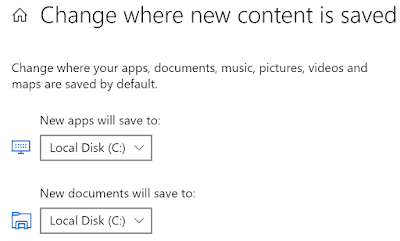
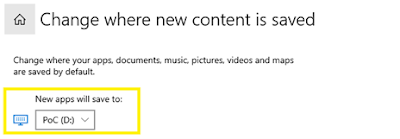
Interestingly, Windows has a neat feature that lets you define where various data should be stored, which is accessible to standard users. This feature is accessible via Storage Settings.
This feature obviously works for Windows apps, and I wanted to confirm this would also work with modifiable Windows apps. So, I set the destination drive for new apps to a different drive on my system and tried the installation process again. Great news, the ModifiableWindowsApps directory and the game were both placed on the new drive.
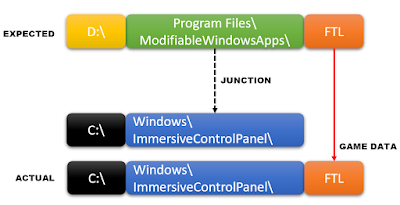
Potentially, this could be a way to gain write access to the ModifiableWindowsApps directory when this is deployed on a different drive (rather than C:), and all I had to do was prepare the destination drive (i.e. any other drive on the system, even an empty USB stick) with a combination of junctions and bait the installer via Storage Settings.
Challenge Accepted
It was time for me to put all the pieces together and try to exploit this mechanism and see if the workflow I envisioned earlier, with a minor change (bouncing from one drive to another), would work and reveal an interesting implementation flaw:
First off, I set the junction to hijack the installer using the following commands (assume D: is any other available drive on the system – even a USB stick):
Then, I changed where the Windows apps should be stored via Storage Settings:
And installed the game:
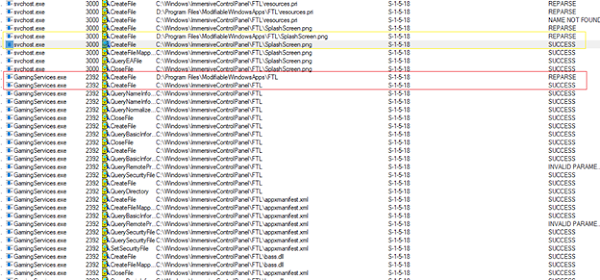
While monitoring the installation via ProcMon:
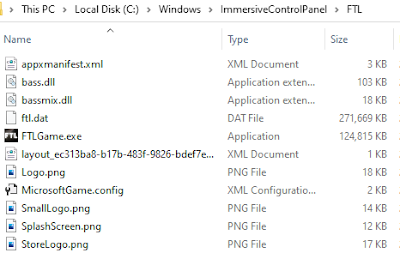
To confirm the game data was actually written into my arbitrary directory:
At this point I knew a standard user could write data into any arbitrary directory on the system, but what about deleting files? The first approach that came to mind was trying to uninstall the game.
Unfortunately (or fortunately), the uninstall process only removes game files (stored in the actual game directory) and it didn’t appear to touch any unrelated data.
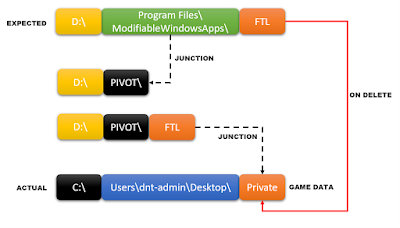
But what if the game directory itself is a junction? What if we use a double junction to trick the installer into thinking that the game installation directory itself is another directory on the system?
This way, when the installer attempts to delete the game data, instead of deleting the content of the game directory (i.e. “FTL“), it will remove the content of an arbitrary directory on the system (i.e. the “Private” directory stored on the admin’s desktop):
So, I prepared my attack environment again but with a little twist, I would use a double junction to wipe an arbitrary directory by pivoting the installer towards my target:
After setting up the environment, I performed the same steps as described earlier for the arbitrary write scenario, with a little change when performing the installation step. In fact, to trigger the “delete”, one would need to interrupt the installation (after the download completes) via the Microsoft Store or wait for the installer to throw an error:
And by doing so, all the data in the targeted directory was actually wiped.
As a final comment before we jump to the last section, please note that it is possible to achieve good control over where the game data is written to (or which files to delete) by the installer by using multiple combinations (and levels) of symbolic links.
Elevation Time
People usually say “pics or it didn’t happen”, so I shall leave a GIF(t) below of a standard user spawning a shell running as nt authority\system by exploiting this vulnerability:
Hope you enjoyed the reading! Game on and play safe!
INSIGHTS, RESEARCH | October 6, 2020
A journey into defeating regulated electronic cigarette protections
By
Ehab Hussein
TL;DR: This blog post does not encourage smoking nor vaping. The main focus of this blog will be defeating the protections of a regulated electronic cigarette to assess the ability of it being weaponized via a remote attacker by modifying its firmware and delivering it through a malware which waits for electronic cigarettes to be connected over USB or discovered over Bluetooth.
The electronic cigarette market continues to grow. According to statistics presented by the market research company EuroMonitor, the number of people who vape will reach almost 55 million by 2021. In this blog post, we showcase different ways to weaponize electronic cigarettes or their components to cause fires and/or explosions, which can physically impact sectors such as the Aviation industry.
Vaping 101:
Prior to creating havoc, let’s do a quick walkthrough of the components that comprise a mod vape. There are two common types of mod vapes: regulated and unregulated.
Regulated (box) mods have built-in protections against overheating and continuous firing and regulate the power flow through the device.
Regulated Mod
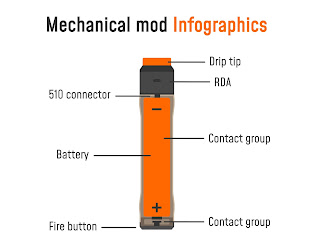
An 18650 battery is the most common type of battery used in box mods. They are lithium-ion cell, which are high-drain, rechargeable batteries.
Two buttons on the box mod control the wattage and tell the mod how much power to deliver to the coils to make them hotter or cooler.
Box mods can hold one or more batteries. Once the fire button is pressed, the batteries discharge, making the coils heat up and causing the liquid to turn into vapor (hence the term: vape or vaporizer). The user inhales the vapor via the drip tip.
Mechanical mod
Unregulated (mechanical) mods have no circuitry and do not provide any protections. Mechanical mods provide direct power from the batteries to the coil (these are dangerous on their own).
How vape firing looks like
Fire button is pressed.
Current is supplied to the coils which make them heat up.
Liquid on the cotton wick evaporates.
1- The problem with vape batteries:
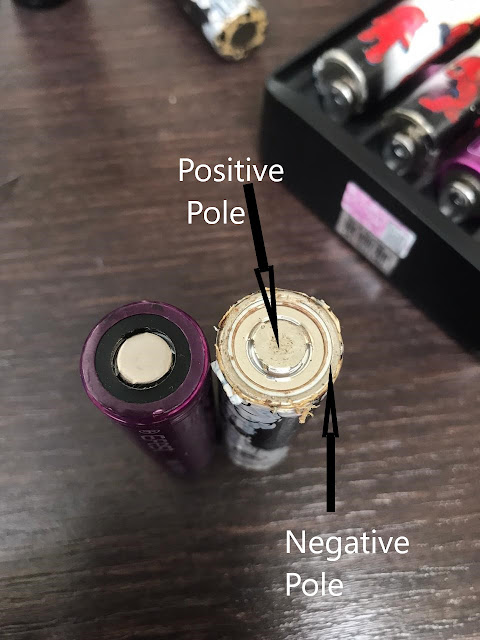
The majority of batteries are encased in steel and shrink-wrapped to ensure proper isolation of the positive and negative poles and prevent a short. A short could lead to an explosion or fire depending on the quality of the battery.
High-quality batteries come with safety valves and a protection board, which keeps the safety performance quite high. When a high-quality battery is shorted, the safety valve opens, releasing the pressure and preventing an explosion; but, the chemicals that are released can react with oxygen in the air and still possibly create a fire. Low-quality batteries offer almost no protections. Their safety valves cannot keep up with the fumes being released, thus pressurizing the container and probably exploding.
So what would cause a battery to explode? Well, here are a few potential causes:
Being stored in humid or high-temperature conditions (exceeding 65˚C).
Over-charging, shorts, punctures, being exposed to fire.
Overheating.
Poor maintenance, such as damaging the shrink wrap.
Use of non-authentic batteries (a.k.a. clones).
Using batteries to power coils with inappropriate resistance ratings.
One major problem that vape users face is damage to their batteries’ shrink wrap. Due to repeated removal and insertion, the shrink wrap starts to peel off the battery. This exposes the negative and positive poles, which could allow shorting in certain conditions.
Well maintained battery vs poorly maintained battery
The battery on the left is properly sealed with shrink wrap, while the battery on the right has had its shrink wrap peeled off due to excessive use (placing it into the charger and back into the mod).
The dangers of such batteries include the fact that they can be taken onboard planes with no restrictions. Using just a battery and a coin, you can create a fire or explosion, depending on the quality of the battery.
Battery with a damaged shrink wrap shorted with a coin
2- Disabling protections of a regulated mod:
To weaponize a regulated mod, we need to first set some goals in order to get the best results. Here’s a list of things we need to do:
Acquire the the firmware. [✔️]
Find and patch the protections: [✔️]
Continuous fire protection. [✔️]
Disable Maximum temperature protection. [✔️]
Set its initial watt/temperature to the max.[✔️]
Trigger the firing mechanism without pressing the fire button.[✔️]
Disable other protections that are triggered along the way.[✔️]
Reprogram the mod and see if it accepts modified firmware.[✔️]
There are two ways to acquire the firmware: from the vendor’s site (vendors usually have firmware in the support section of their websites where they provide software updates) or by dismantling the device (looking for debug pins (JTAG/SWD) and dumping the firmware).
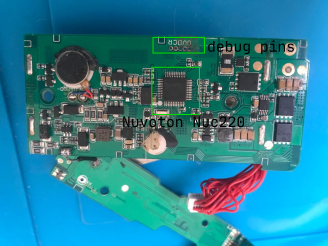
To dump the firmware, we start by identifying the components in the box mod vape.
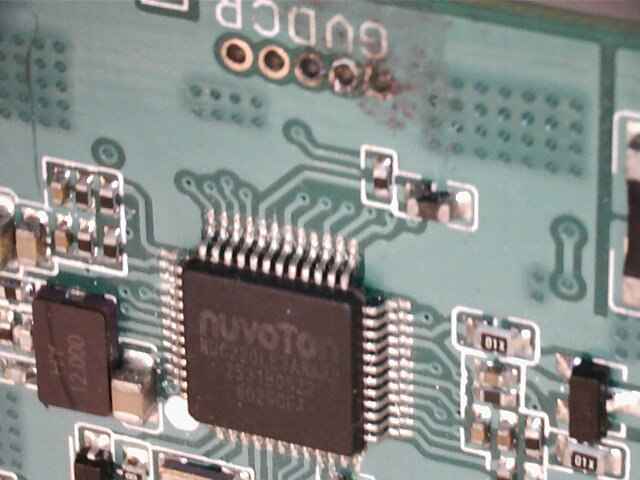
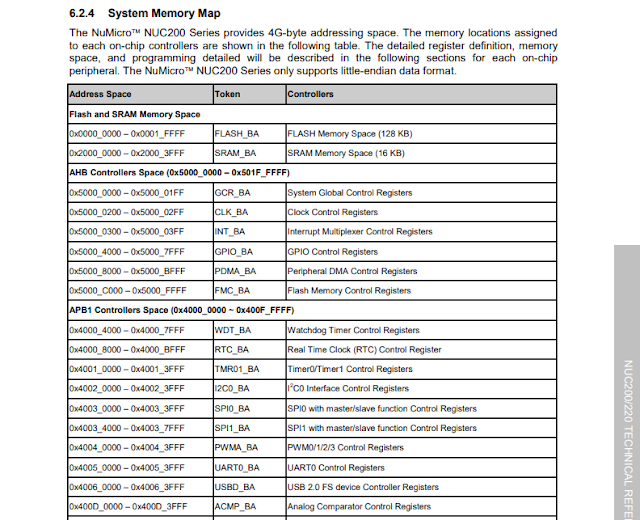
This regulated mod uses a Nuvoton NUC220LE3AN an ARM cortex-m0 microcontroller
Nuvoton NUC220LE3AN
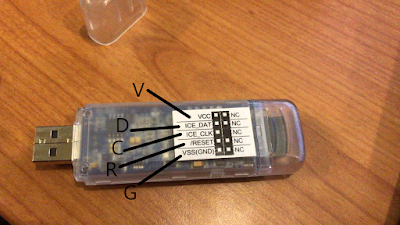
The following pins are exposed on the PCB:
G: VSS (Ground)
V: VCC (Power)
D: DATA
C: CLOCK
R: RESET
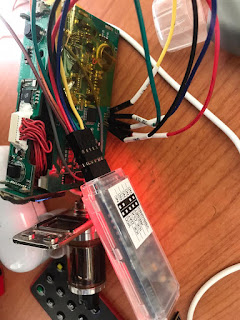
Nu-Link Pro programmer/debugger
Hooking the Nu-link to the Box mod
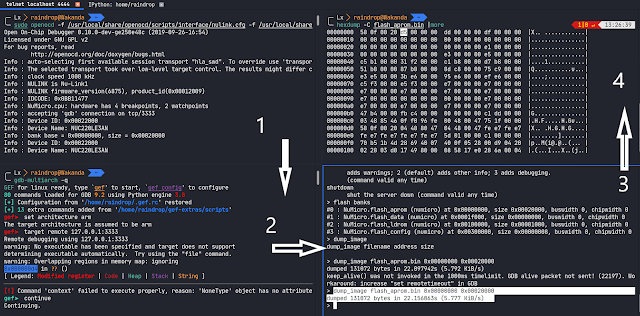
We used the following steps to dump the firmware:
1.) Hook the NuLink-pro debugger to the Nuvoton chip using OpenOCD. 2.) Attach gdb-multiarch to remote target. (multiarch used for arm) & we’ll debug later. 3.) Telnet to OpenOCD on localhost:4444 to dump firmware. 4.) Check the dumped image.
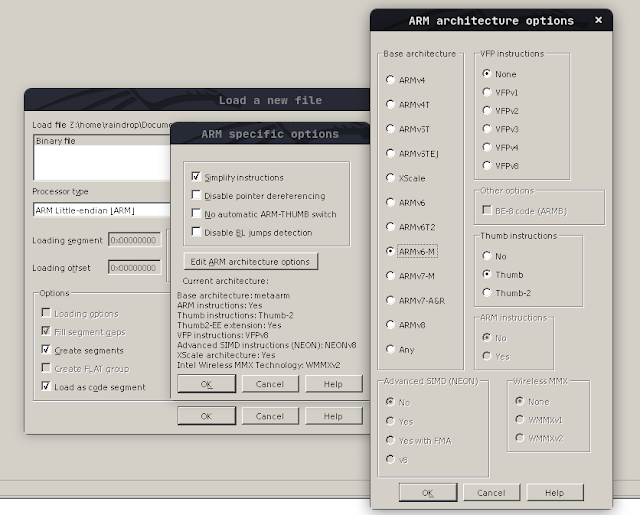
Once you’ve acquired the firmware, it’s time to take it to your favorite disassembler and load it.
ARM Cortex-M0 is little endian , ARMv6-M Architecture , Thumb instructions
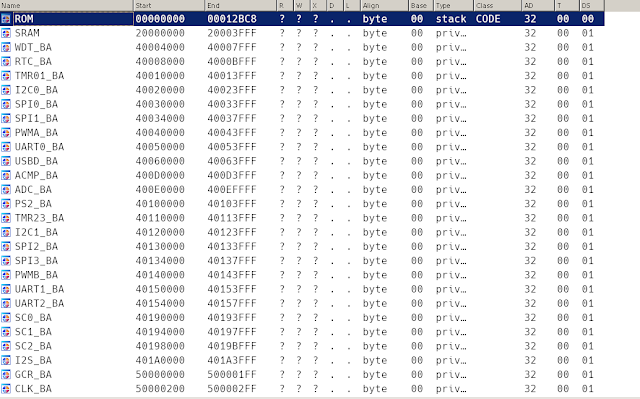
Then create the segments in accordance with the microcontrollers datasheet
[TIP]: If you use IDA-PRO 7.5 or BinaryNinja you can use the SVD plugins to create your chip’s peripherals by obtaining its SVD file and loading it via that plugin.
An SVD file is a XML file which includes the descriptions and information for your chip’s peripherals.
Create segment mapping by reading the datasheet for the chip
Or, you can write a small script and let it create the segments for you.
Segments created
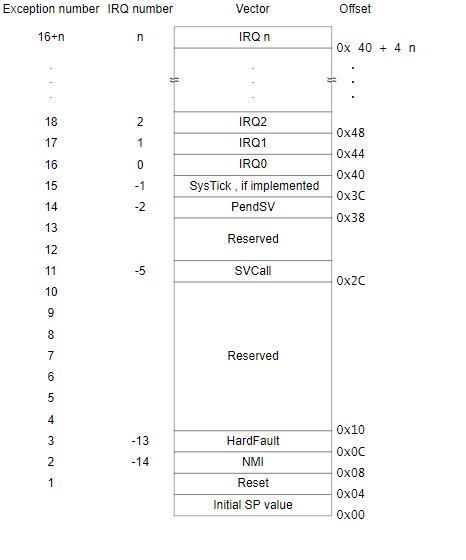
Align the interrupt vector table: (the interrupt vector table is 4-byte aligned)
An interrupt vector table is a structure full of exception handlers; when an exception is triggered, a function is called and its instructions are executed. Each exception in the interrupt vector table points to a function. For instance, if you press a button on a device, it triggers an exception. The function associated with the exception is looked up in the interrupt vector table, and the instructions within that function are executed.
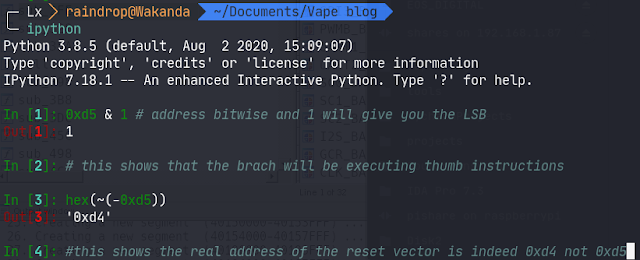
The interrupt vector table includes an exception named the reset vector. This address is the entry point where the first instructions that the microcontroller will execute after a reset/startup/boot are found (usually at offset 0x4 from the firmware’s base address).
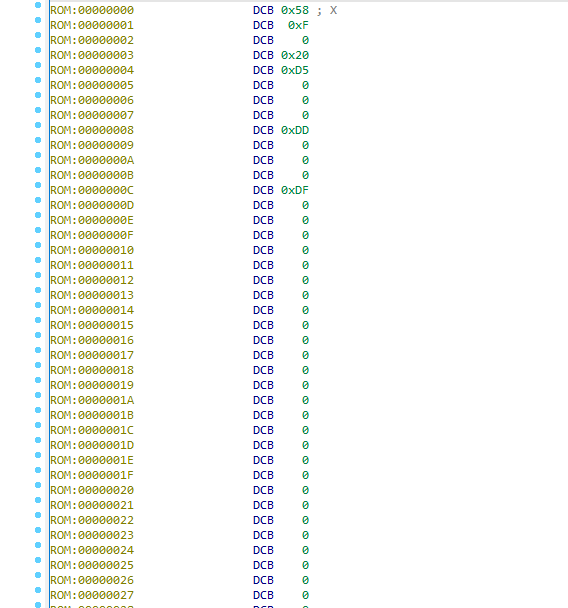
The image below illustrates how the interrupt vector table is aligned.
· The reset vector initially points to address 0xd5, which is actually one byte after the real reset vector address. The reason behind this is that before it branches to an address, the microcontroller checks to see if the LSB is set to 1 or 0. Depending on the value, it will branch to execute Thumb (1) or ARM (0) instructions. In our case, the LSB will be set to 1 as the ARM Cortex-M0 executes Thumb code. If the LSB is set to 0, it will raise a hard-fault exception since there are no ARM instructions supported here. To know what a branch will do, you can simply do a bitwise operation on the address. Once you get the address, go to the reset vector address, convert it into a function, and let the disassembler do its magic.
Now we’re all set for finding our protections and start our patching process.
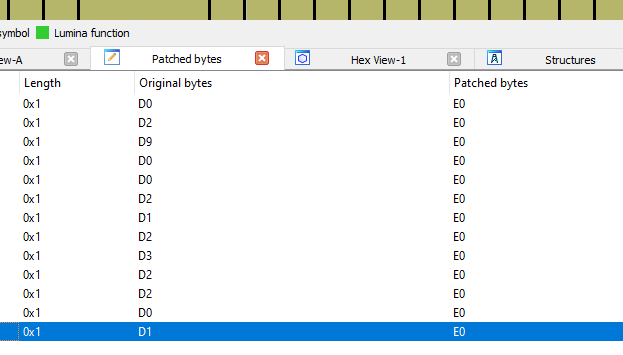
Patch#1 Disable maximum temperature protection
· This protection does not allow the vape to fire if the device temperature exceeds 75˚C (0x4b). This can be patched to 0xff (255˚C) or disabled altogether, meaning there is no max temperature check.
Device temperature check (75C)
Patch#2: Set initial watt/temperature to max
These patches set the mod to deliver maximum power to the coils. Referring to the video below, you can hear the difference when the mod is fired at the same wattage (6.1) before and after patching the firmware.
Before (Left) and After (Right) Patching
Before (Left) and After (Right) Patching
Patch#3: Disable continuous fire protection
This can be accomplished by patching the firmware to never allow the GPIO’s data output value to be reset to its original value, which in this chip was `0x0000FFFF` (see patch #4).
Patch#4: patch the firmware to trigger the firing mechanism without pressing the fire button
The following video demonstrates what can happen if the device is programmed with malicious firmware that causes the vape to fire on its own.
Enabling the fire button via software, no need to press the fire button
Other Protections:
I found a few other protections that needed to be patched, such as:
OHM resistance checks for the coils.
Battery checks.
Max puffs.
Atomizer checks.
Protection Abuse checks.
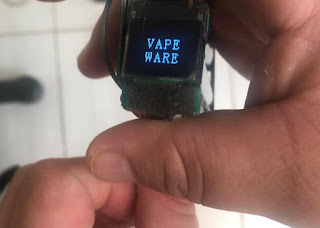
ME ABUSING PROTECTS!
Based on what I learned about the inner workings of regulated vape devices, I do believe that in certain cases vapes can be weaponized. A malicious actor could wreak havoc by causing them to explode or start a fire remotely, since the firmware can be patched to make the vape or its components operate without any sort of protection in place, effectively turning it into a unregulated mechanical mod.
Threat scenarios:
I don’t doubt that in the near future we will see malware (MalVape, vapeware) targeting users that charge their devices from a laptop or devices that support OTA updates via Bluetooth. Simply put, malware can listen on USB/Bluetooth for vape devices and then trigger a firmware update, reprogramming the vape to become weaponized.
Vapes, high-drain batteries, and coins are allowed on airplanes. A malicious actor can cause a fire in an aircraft lavatory by throwing a battery attached to a coin into the waste bin where all the tissues are thrown. Same goes for the vape being triggered.
Vapes can be maliciously programmed to suddenly fire at a set time and date, if they have time and date settings.
Recommendations:
Vape firmware should be signed and encrypted:
Firmware that is signed ensures that the firmware being reprogrammed to the device is indeed by the vendor not by a malicious actor.
Encrypting firmware makes it more difficult for attackers to reverse engineer it. Although this is security by obscurity, it would stop most attackers.
Vapes can be dangerous if poorly maintained.
Don’t charge your vape from a laptop. Use authentic external battery chargers.
Always ensure Bluetooth/wireless connectivity is switched off on your vape if it supports OTA firmware updates. In general, vapes shouldn’t have wireless capabilities, as it expands the attack surface.
Choose and buy authentic and well-known atomizers and mods.
Always ensure that you purchase Authentic batteries. Accidents happen when fake batteries are used.
Always carry batteries in a battery case.
Battery Case
References:
The Definitive Guide to ARM Cortex -M0 and Cortex-M0+ Processors 2nd Edition by Joseph Yiu (Joseph writes the best ARM books I recommend reading his books)
A password hash is a transformation of a password using what we call a “one-way” function. So, for example, ROT-13 (rotate by half the alphabet) would be a very, very bad password hash function and would give fairly recognizable results like “Cnffjbeq123!”. The one-way property means it must be essentially impossible to construct the inverse function and recover the original, and functions like MD5 or SHA1 certainly meet that particular criterion. Iterated encryption functions like DES have also been used (for example LAN Manager hashes), but seem to have fallen out of favor a while ago. There are a load of technical, cryptographic details which neither you or I need to know, but essentially we’ll end up guessing at loads of passwords and then performing the same one-way function and checking to see if we’ve arrived at the correct answer.
Now if we wanted to optimize our guessing procedure, we could create a giant lookup table of all possible passwords and all possible corresponding hashes. (As an aside, this might actually be slower than computing a really fast hash like MD5, because disk access is slower than doing a small number of things in CPU.) So at some point, a long time ago, a thing called a salt was added to the password hash on UNIX systems. A salt is a random number stored along with the hash, which goes into the hash computation as well. This gives two benefits:
If the salt is long enough and random enough, it is no longer feasible to build a lookup table – it just gets too big.
You have to attack each hash on its own; i.e. run a separate computation for each (salt, password candidate) pair.
So we arrive at something like sha512crypt, which is many iterations of SHA512 with a large random salt. It is fairly slow to compute each guess, which makes our job harder, for example:
So the problem now becomes “just” choosing all the magic parameters, which are explicit with hashcat and implicit with John the Ripper. Because I don’t like typing the same thing over and over again, I wrote a helper script called “hashcrack” (https://github.com/blacktraffic/hashcrack).
Briefly, hashcrack tries to guess the hash type and then runs some sensible attacks based on the speed of the hash. It of course does this by invoking hashcat, John the Ripper, a bunch of conversion/extraction scripts that come with John the Ripper, or occasionally impacket or SQLite. For example, taking a Responder db file (from the test suite) below:
D:\hashcrack>python hashcrack.py -i tests\Responder.db
    Running under win32
    Reading file: D:\hashcrack\tests\Responder.db
    Couldn't parse first line of file - trying as latin1

    [at this point it pulls out the NetNTLMv1 and v2 hashes into .tmp files - "SELECT fullhash FROM responder where type like 'NTLMv2%'" ]

    RUN: hashcat.exe -a0 -m 5600 D:\hashcrack\tests\Responder.db.tmp D:\hashcrack\dict\\\Top95Thousand-probable.txt -r D:\hashcrack\rules\\\best22405.rule  --loopback  -O --bitmap-max=26  -w3  --session hc
    ...
    IEUSER::IEWIN7:ed9cc20456c23e34:939e00dfea66e08e8b...03100000000000000000000000000:Passw0rd!
It is very much a glorified helper script, but it does at least tell you what command it decided to run in case you do need to tweak it further, and it does its best to unpack whatever it is to hashcat format.
First, catch your hash
Obtaining and recognizing hashes and then turning them into the correct format for John the Ripper or hashcat is not always a trivial exercise. At a minimum, we have the following main types.
Windows
Stored passwords, such as NTLM – How Attackers Dump Active Directory Database Credentials – https://adsecurity.org/?p=2398
NetLMv1/v2 – These can be captured using Responder or leaked from various applications, if you can get them to connect to your fake SMB share.
Kerberoasted hashes – These can be captured using Invoke-Kerberoast, Rubeus, or similar to perform Kerberoasting against an AD domain.
Domain cached credentials – These can be captured using password dumping tools on the local machine or by taking the three registry hives (security, system, and SAM) and unpacking them with impacket’s “secretsdump” (https://github.com/SecureAuthCorp/impacket)
UNIX
For Linux, these would typically be in /etc/shadow and the format will be sha512crypt or bcrypt for modern operating systems, starting with things like “$2$” or “$6$”. For AIX, you might find DEScrypt hashes in /etc/security/passwd, but the common theme is crypt formats (https://www.man7.org/linux/man-pages/man3/crypt.3.html).
Database
Generally, as DBA, you can query the password hashes out of the databases such as PostgreSQL, MySQL, Oracle, MSSQL, etc.
Documents
Password protected ZIP, Word, Excel, PDF files – Various scripts that come with John the Ripper which extract password hashes from these files.
Web Applications
You might see these if you can connect directly to the backend database or if you can exploit SQL injection. This can be anything the developers thought was a good idea, from MD5 to bcrypt. Using the phpass format as an example, it might be something like $P$984478476IagS59wHZvyQMArzfx58u.
Information implied by format
So where you get the hashes from gives you some clues about how to proceed. All Windows hashes should meet the domain’s password policy – unless the admins have given special dispensation. Web or database passwords could be any length in theory. WPA2 passwords must be at least eight characters according to the standard.
For unsalted hashes, such as plain MD5, or NTLM, or SHA1, you can attack a thousand hashes as quickly as one, so you may as well load them all up. Otherwise, you may need to pick hashes of particular interest.
Again with the quicker hashes, you may as well just throw everything at it and see what comes out – you can always refine your approach based on what you crack. With slower ones, it’s worth thinking about it or trying to find “cribs” (potential passwords, or parts of passwords) elsewhere on the system.
Benefits and constraints of using a GPU
You can of course do this all on CPU if you want, but for most hash types, GPU is much quicker. For example, bcrypt can be quicker on CPU because it has been designed that way. I’m not going to talk about FPGAs here, but that is a good approach if you really need it (e.g. https://www.usenix.org/system/files/conference/woot14/woot14-malvoni.pdf)
Because a lot of people like playing games with nice graphics, fairly cheap parallel processors are readily available. But there are certain limitations on how we can get them to process our workload. For the two most popular password cracking programs, hashcat and John the Ripper, this means expressing the search space in terms of a dictionary and a set of rules (or transformations) or a mask, which is essentially a set of possible character values to search. For the faster hashes, like NTLM and SHA1, you will need to supply a list of rules and a big enough wordlist in order to keep the GPU busy – I gather this is something to do with how quickly you can send data over the bus, but whatever the reason, using a short wordlist and no rules will not make best use of the GPU (hashcat will warn you about this).
Meanwhile, mask attacks are quick if you give a sufficiently large search space.
Hashcat expresses masks in a slightly odd way, so we have ?a, representing all ASCII values, ?d representing digits, ?l and ?u being lower- and upper-case respectively, and ?s meaning special characters. You may also see ?b which means any byte.
Thus a search using ?u?l?l?l?l?l?l?l?s will eventually match Password!, but will also catch everything from Aaaaaaaa! through to Zzzzzzzzz}
In the same way, the rules language describes how to transform a base word into the final guess, in terms of deleting or swapping characters or adding them to the start or end of the word. Like a CPU, it only implements a finite set of common operations, and we have to work with what’s there. If we assume “password” is the base:
$1$2$3 means append 123, so we get password123
^3^2^1 means prepend 123 (because we prepend 3, then prepend 2 to “3password”, etc.)
so0 means swap ALL ‘o’ characters to ‘0’ (zero), so it becomes “passw0rd”
One of the limitations of hashcat is that we can’t just swap some of the o characters to 0s, it’s all or none. (Research shows that humans tend to add complexity to the end of passwords, so suffixes are more likely to be helpful than prefixes.)
Dictionary and Rules
A “normal” run of hashcat might look like this, where we have a dictionary of common passwords in decreasing order of frequency and a rules file. I have given the hashcrack command, and the “RUN: ” is exactly how it decides to run hashcat.
The file I’m running it against is the last couple of million of the Have I Been Pwned NTLM dataset (https://www.troyhunt.com/pwned-passwords-now-as-ntlm-hashes/). I’ve written elsewhere about cracking the first 500 million, but for now, it’s just some convenient test data.
If we look at the debug file produced by doing –debug-mode=4 –debug-file=dbg.log, we can see the dictionary word on the left, the rules applied in the middle, and the thing we found on the right.
We can give a directory as the dictionary argument, which means it tries every file in the directory one after the other. And we can give two rule parameters, which means it combines each rule in the first with every rule in the second. This means it gets big fast, but this can be useful if you have orthogonal rulesets (e.g. one for dealing with passphrases and one for endings like “123”, “123!” etc.). Combining insertions.rule and a normal ruleset got me t++19882008 with the t coming from the normal rules, and the ++ coming from insertions.rule.
Masks and Maskfiles
You can specify a search space using masks. For example, the following will try all ASCII passwords of length 1-5:
You can also specify this in a file, where you can define the character classes ?1, ?2, ?3, ?4 and then use them in the final field of the line. The following will search through default passwords and variants:
And then it will try each one, with the custom charsets given:
Below, the file last1-5.txt contains commonly observed suffixes from my data, but you can also run two password dictionaries against each other. Found passwords will be the concatenation of one entry from the first dictionary and one from the second. In this case, “samtron” is in Top95Thousand-probable.txt and “_r89” is in last1-5.txt.
As with all machine learning/statistical approaches, this works best if your training data is representative of the stuff you’re trying to crack. Which you don’t know, because you haven’t cracked it yet, but it’s a reasonable guess that it might follow the same form as fragments of English text. Travco wrote a nice quick program to do this: https://github.com/travco/rephraser.
In this case, ‘corpus.txt’ should be a lot of English sentences (or from whatever language you think might be in use).
This is the term I use for swapping things like o->0, s->5, e->3 and so on, as people sometimes do in their passwords, for example “Pa55w0rd”. You can do this in rules if you want to swap all occurrences, but I suspected there might be a lot of people who did not consistently do this. Hashcrack can do this using the -3 flag:
and that script does a recursive leetification process.
Which gets us things like the following, where some, but not all, of the characters have been leetified.
Measuring rule quality
You can use debug output to see how often a rule is firing by adding –debug-mode=4 –debug-file=foo to the hashcat command line.
You can then use this data to count how many times each rule fires and plot a nice graph.
Obviously, this doesn’t account for the fact that two different rules may carry out the same transformation. ^”$” and $”^” both enclosed the candidate password in quotes, but only the first one in your list will get counted with this approach.
Measuring password quality
Another thing we can do is visualize how quickly passwords got cracked with any particular method, using hashcat’s status output and counting the cumulative number of passwords at each “tick.”
This can be used for evaluating the overall strength of the passwords – obviously, a steep initial curve means that lots of things cracked very quickly, and the defenders want to make the graph as flat as possible.
Representation and non-ASCII
If you’re trying to crack non-ASCII characters, you need to know how the underlying system deals with encoding and storage of the non-ASCII characters. For example, if you try to crack the NTLM hash for “Gü” :
Let’s take a look at three different hash types with fairly different designs – NTLM, WordPress (phpass), and bcrypt. Firstly, NTLM is not salted, so we can attack many hashes in parallel for free, which is a truly awful thing for defenders. The other two are salted, meaning each hash needs to be attacked separately, making cracking millions of hashes millions of times harder.
The other main difference is relative speed. Using a 1080 Ti as a reference platform, I can get a speed of 50 billion guesses per second against NTLM, around 8 million against WordPress, and about 20 thousand against bcrypt. However, bcrypt comes with a cost parameter, which can be adjusted to make the hash slower to compute, and the hashcat example is unusually generous in using a cost factor of five. Most modern implementations would use 10 or 12, meaning we can only make about one thousand guesses per second.
The purpose of this cost factor is that defenders want to make the computation take as long as possible without actually annoying the user – so, ideally, it would be a couple of hundred milliseconds or so. As computers get faster, we increase the cost factor and hopefully make things prohibitively expensive for attackers. That is, providing we can stop our users from picking passwords like “Summer2020”.
If you are attacking a hash like bcrypt, you need to start with the most likely passwords and possibly only attack the hashes you think are most useful; remember ,computing one bcrypt guess is 50 million times slower than computing one NTLM guess. Therefore attacking 1000 bcrypt passwords is 50 billion times slower than attacking 1000 NTLM passwords.
Just so you can see what the various hashes look like, here’s a demo of cracking the “hashcat” example WordPress (phpass) hash:
Uncovering Unencrypted Car Data in BMW Connected App
By
Alejandro Hernandez
TL; DR: Modern mobile OSes encrypt data by default, nevertheless, the defense-in-depth paradigm dictates that developers must encrypt sensitive data regardless of the protections offered by the underlying OS. This is yet another case study of data stored unencrypted, and most importantly, a reminder to developers not to leave their apps’ data unencrypted. In this case study, physical access to an unlocked phone, trusted computer or unencrypted backups of an iPhone is required to exfiltrate the data, which in turn does not include authentication data and cannot be used to control or track the vehicle in any way.
Introduction
“While modern mobile operating systems allow encrypting mobile devices, which users can use to protect themselves, it is ultimately the developer’s responsibility to make sure that their software is thoroughly safeguarded. To this end, developers should provide reliable mobile app data encryption that leaves no user data without protection.” — Dmitriy Smetana.[1]
Physical theft is not the only attack vector that threatens the data stored on a mobile phone. Imagine, for instance, a shared computer at home or in the office where a phone has been authenticated and trusted. When the phone is connected and authenticated, a malicious actor with access to this computer would be able to extract its apps’ data. The likelihood is low in the real world, though.
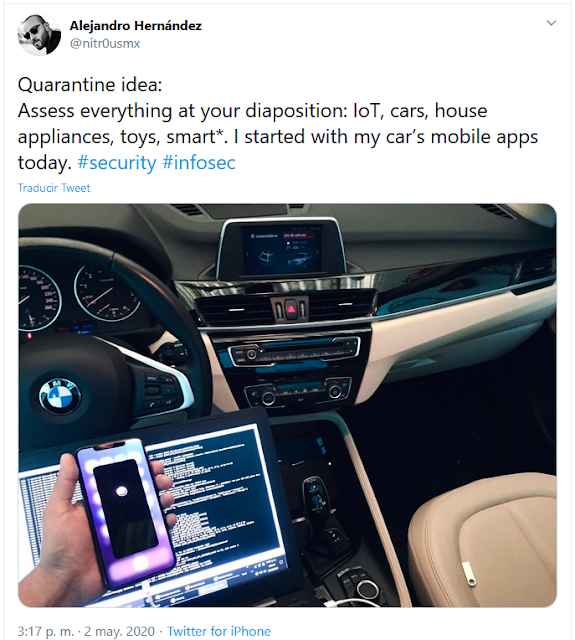
One day during the pandemic I was wondering if my car’s mobile app was encrypting the data or not. So, I decided to analyze it:
The following navigation-equipped cars were used for this analysis:
· X5 xDrive40i (2020)
· 120i (2020)
· X1 sDrive20iA X Line (2018)
BMW Connected is a mobile app compatible with 2014 and newer navigation-equipped vehicles (BMW ConnectedDrive[2]). It allows the user to monitor and remotely control some features such as:
· Lock/Unlock
· Location tracking
· Lights
· Horn
· Climate control
· Destinations (navigation system)
· Doors and windows status
· Fuel level
· Mileage
BMW Connected App Demonstration
The latest version of the app available on Apple Store was:
· BMW Connected for iOS v10.6.2.1807
I installed the app on two iPhones, neither of which were jailbroken:
· iPhone XS Max (iOS 13.4.1)
· iPhone 8 Plus (iOS 13.3.1)
Then, I found unencrypted data using the following basic tools:
You’ll see how easy it was to extract and decode the stored data.
Data Stored Unencrypted
The cars were added and authenticated within the app:
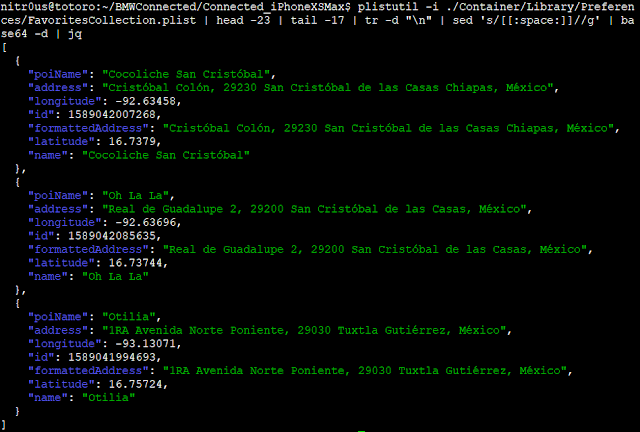
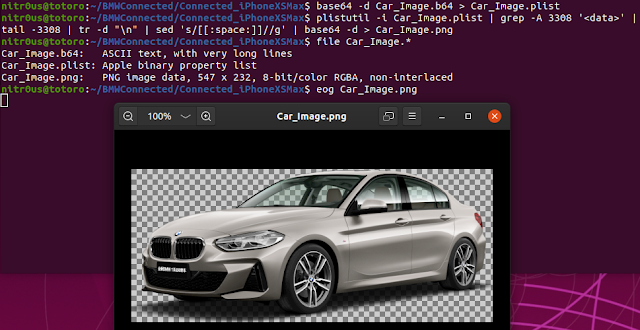
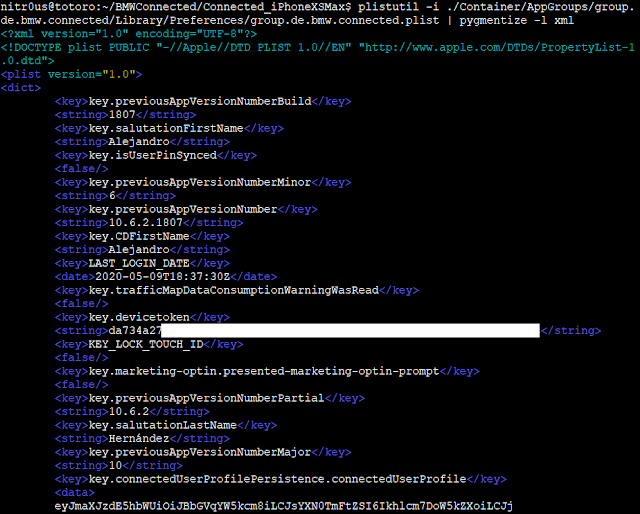
For both installations, the same behavior was observed: data was stored base64-encoded but unencrypted in .plist files. I used the plistutil command to decode such files, then, I piped the output through other command-line tools to strip empty lines and spaces.
Once I had the base64 strings, I decoded them with the base64 tool and finally, formatted and colorized the JSON output with the jq tool:
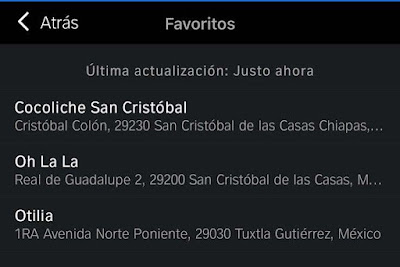
· Favorite locations (FavoritesCollection.plist)
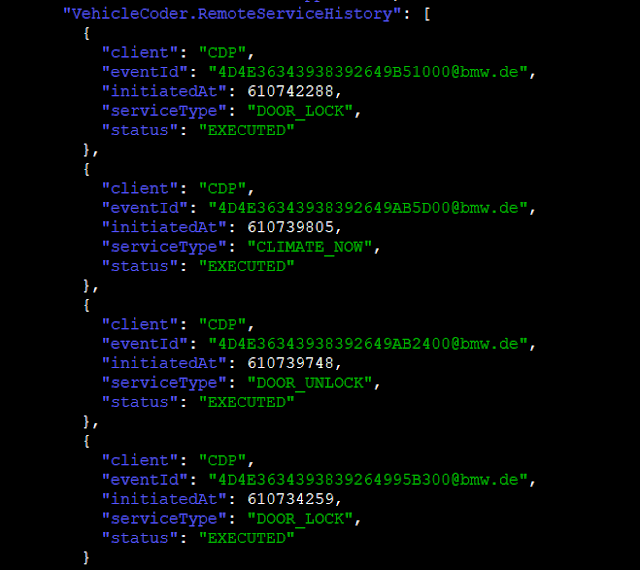
· Directions sent to the vehicle (TripStorage.plist)
· Status of doors and windows (VehicleHub.Suite.plist)
· Mileage and remaining fuel (VehicleHub.Suite.plist)
· History of remote actions (VehicleHub.Suite.plist)
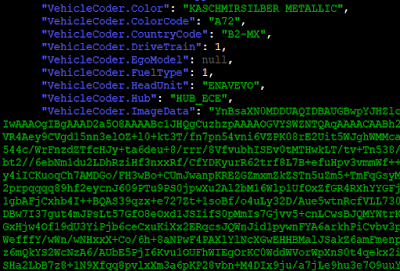
· Car color and picture (VehicleHub.Suite.plist)
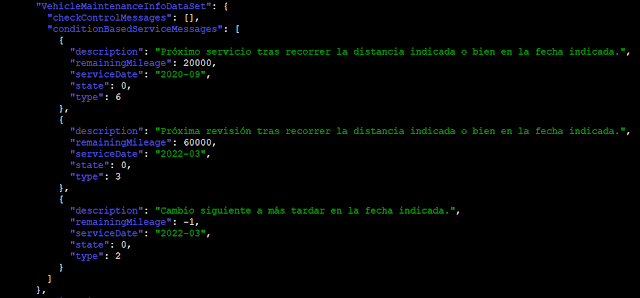
· Next maintenance due dates (VehicleHub.Suite.plist)
· VIN and model
· Owner’s first and last name and last logged date (group.de.bmw.connected.plist)
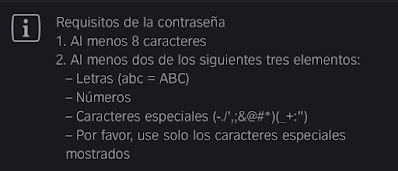
Weak Password and PIN Policies
On registration, I noticed the password policy only required eight characters from at least two of the following three charsets:
· Letters (abc = ABC)
· Numbers
· Special characters
Such a policy might seem good enough; however, making the password case-insensitive significantly decreases its complexity. During testing, it was possible to login with any of the following passwords:
· Qwerty12
· QWERTY12
· QwErTy12
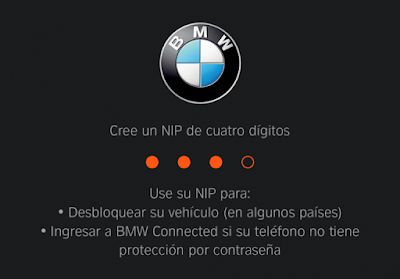
Also, the app permits users to select an easy-to-guess PIN, which is used to unlock the car or access the app if the smartphone does not implement FaceID, TouchID, or a passcode. The existing PIN code policy allows users to choose weak combinations, such as consecutive numbers (e.g. “1234”) or the same number (e.g. “0000”).
However, the most commonly used feature for authentication is either FaceID or TouchID.
Recommendations
The takeaways are very simple:
· For end-users:
o Only authenticate your phone on trusted computers.
o Avoid connecting and trusting your phone to shared workstations.
o Use complex passwords and PIN codes.
· For developers:
o Do not put your complete trust in the operating system.
o Encrypt sensitive data on your own.
Responsible Disclosure
One of IOActive’s missions is to act responsibly when it comes to vulnerability disclosure.
The following is the communication timeline with BMW Group:
· May 2, 2020: IOActive’s assessment of the BMW Connected App started.
· May 15, 2020: IOActive sent a vulnerabilities report to BMW Group following its guidelines.[4]
· May 20, 2020: BMW Group replied. They internally sent the report to the responsible departments.
· May 26, 2020: IOActive asked BMW Group for any updates or questions and let them know about our intention to write a blog post.
· May 28, 2020: BMW Group said to wait for a new app release prior publishing a blog post and asked for details to include the researcher in BMW Group’s Hall of Fame site.
· Aug 07, 2020: BMW Group and IOActive had a call to discuss the technical information that would be published in a blog post.
· Aug 13, 2020: BMW Group sent an email explaining how they would fix the issues.
· Aug 19, 2020: IOActive sent a draft of the blog post to be published to BMW Group for review.
· Aug 24, 2020: BMW Group suggested some modifications.
· Sep 08, 2020: IOActive sent the second version of the draft of the blog post to be published to BMW Group for review.
· Sep 11, 2020: BMW Group agreed with the final content.
· Sep 22, 2020: IOActive published this blog post.
The Fix
BMW Group’s security statement:
“Thanks to the notification of Alejandro Hernandez at IOActive via our responsible disclosure channel, we were able to change the way the app’s data cache is handled. Our app development team added an encryption step that makes use of the secure enclave of Apple devices, at which we generate a key that is used for storing the favorites and vehicle meta data that Alejandro was able to extract. We appreciate Alejandro for sharing his research with us and would like to thank him for reaching out to us.”
Acknowledgments
I would like to give special thanks to my friend Juan José Romo, who lent me two brand new cars for testing.
Also, I’d like to thank to Richard Wimmer and Hendrik Schweppe of BMW Group for their quick response and cooperation in fixing the issues presented here.
No buffers harmed: Rooting Sierra Wireless AirLink devices through logic bugs
By
Ruben Santamarta
There are not many occasions when you can build a chain of exploits and not harm a single buffer, so it is interesting when you find yourself in one of those rare situations. As the title clearly indicates, this blog post will comprehensively describe the entire process that would allow a malicious actor to root Sierra Wireless AirLink® devices.
Let’s do this!
A couple of years ago the guys at Talos did a great job and killed many bugs in AirLink devices. As usual, before buying a device I always analyze the firmware first in order to get an overall impression of what I may face. Sierra Wireless has a nice website where it is possible to download firmware, so I chose my target (the RV50) and proceeded.
Analyzing the Firmware
After unpacking the firmware, we are presented with the following list of files:
The first notable thing is that well-known image formats, such as ‘rootfs.sqfs.uboot’, ‘uImage.recovery’ or ‘zImage’ are detected as ‘data’ so there should be something going on. As expected, a quick look at those files shows that they are definitely encrypted. Hopefully the only ‘clean’ binary that is present in the firmware (‘swinstaller’) will help us to figure out the scheme.
As you can see, it seems that, as we initially guessed, the important files are all encrypted. So, the next step is to spend some time digging through a C++ binary to understand the encryption algorithm. Some of the strings clearly pointed to ‘libtomcrypt’ as the encryption library, which definitely will help to reconstruct some of the symbols and logic in order to facilitate this sometimes tedious task.
They are using AES CTR without any apparent hardcoded key or IV, so there should be some logic that generates them at runtime. After reverse engineering the binary, we can break the encryption scheme into two different items: the values needed to derive the IV and the key and process for deriving them.
1. Values
There are two different values that are required to properly derive the IV and the key for AirLink devices
1.1 Custom ‘seed’
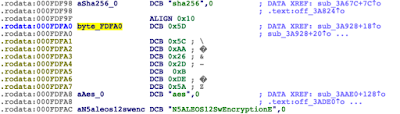
This 8-byte hardcoded value can be found in the ‘swinstaller’ binary, close to the ‘sha256’/’aes’ strings in most cases.
Please note that it may vary across devices and versions.
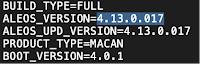
1.2 Custom ‘version’
This value can be found in the ‘manifest.txt’ file and corresponds to the ‘ALEOS_VERSION’ value, highlighted in the image below.
As in the previous case, it will obviously be different across versions.
2. Deriving the IV/Key
This non-canonical simple pseudo-code can be used to get an overall idea behind the generation.
  a = "\x00"*32
  b = version+seed
  copy(a, rounds_sha256(b), 32)
  materials = rounds_sha256(a+b)
  iv = materials[0:31]
  key = materials[32:63]
The full logic to decrypt AirLink firmware files has been implemented in following file:
// For research purposes only
//
// Sierra Wireless' Airlink Firmware Decrypter (Ruben Santamarta @ IOActive)
// @IOActiveLabs https://labs.ioactive.com
//
// Dependencies:
// libtomcrypt https://github.com/libtom
//
// Compile
// $ gcc decrypter.c -o decrypter -Isrc/headers libtomcrypt.a
//
// Example
// KEY is the ALEOS_VERSION at manifest.txt (manifest.txt!ALEOS_VERSION=KEY)
// $ ./decrypter -d KEY aes /file/path/RV50/rootfs.sqfs.uboot /file/path/RV50/rootfs.sqfs.uboot.decrypted 4096 1

/*
Example output for RV50 firmware - ALEOS_VERSION=4.13.0.017

* Sierra Wireless' Airlink Firmware Decrypter (Ruben Santamarta @ IOActive) *

- Initializing materials...
Hashing at keyBuff+32 for 18 bytes...
round 1
round 2
round 3
round 4

Copying 32 bytes from the hashed material to keyBuff

Now hashing the entire keyBuff [50 bytes]...
round 1
round 2
round 3
round 4

***=> IV:  "\x11\x5F\x24\x07\x50\x3C\x68\xD2\x28\x26\xBA\x18\x4B\x12\x54\xF1\x2C\x20\x36\x01\x45\x86\x42\x99\x05\x6D\x43\x3C\xC5\x80\xCA\x94"
***=> Key: "\x7D\x69\x78\x59\x55\x35\xF9\xAA\x4F\x8E\xBE\xE4\xE8\xD2\xEE\xFA\x86\x35\xD1\x6A\x58\x81\x53\x78\x6D\xFF\x2E\xB5\xBC\x88\x21\x11"

[+] Decrypting firmware to decrypted.bin...
[+] Done

*/


#include <tomcrypt.h>
#include <stdio.h>
#include <stdlib.h>
#include <string.h>

int errno;

typedef struct _product_key{
  unsigned char seed[8];
  char *name;
} product_key;


// SEED TABLE  (ALEOS VERSION 4.13.0.017)
// Extracted from the 'swinstaller' binary (different from product/version)

product_key seed_table[]={
                            {"\x60\x22\xD5\xCD\x3C\x09\xCD\xAB","ES450"},
                            {"\x5D\x5C\xAA\x26\x2D\x0B\xDE\x5A","RV50"},
                            {"\xFB\x76\x0D\xCE\xC1\x2C\xC8\x16","LX60"},
                            {"\xCB\x4E\x4A\x5F\x07\x89\x0B\xDE","RV55"},
                            {"\x1C\xDF\x8D\x14\xB3\x61\xCF\x12","MP70"},
                            {"\x60\x22\xD5\xCD\x3C\x09\xCD\xAB","GX450"},
                            {0}
                          };


int generate_materials(unsigned char *inBuff, int len, void *dest, size_t *a4, int a5);
int init_keys(char *keyString, int len, int product, unsigned char **key, unsigned char **IV);


int init_keys(char *keyString, int len, int product, unsigned char **key, unsigned char **IV)
{

  unsigned char *keyBuff;
  unsigned char keyHash[64]={0};
  unsigned char ivHash[64]={0};


  size_t  retLen;
  size_t  keylen,totalen;
  int     result;


  printf("\n- Initializing materials...\n");


  *key = (unsigned char *)calloc(0x40,1);
  *IV = (unsigned char *)calloc(0x40,1);

  keylen = len;

  totalen = keylen + 40;

  keyBuff = (unsigned char*)calloc(totalen, 1);

  retLen = 32;


  // Copy key string "\x00"*32+key
  memcpy(keyBuff + 32, keyString, keylen);

  // Copy remaining materials "\x00"*32+key+seed
  memcpy(keyBuff + 32 + keylen, seed_table[product].seed, 8);

  printf("Hashing at keyBuff+32 for %lu bytes...\n",totalen - 32);
  result = generate_materials(  (keyBuff + 32),
                                totalen - 32,
                                keyHash,
                                (size_t*)&retLen,
                                5);


  printf("Copying 32 bytes from the hashed material to keyBuff\n");
  memcpy(keyBuff,keyHash, 0x20);

  retLen = 32;

  printf("\nNow hashing the entire keyBuff [%lu bytes]...\n",totalen);
  generate_materials(   keyBuff,
                        totalen,
                        ivHash,
                        (size_t*)&retLen,
                        5);


  memcpy(*IV,ivHash,0x20);
  memcpy(*key,keyHash,0x20);

  printf("***=> IV:  \"");
  for(int i=0; i<32;i++){
    printf("\\x%02X",ivHash[i]);
  }
  printf("\"\n");

  printf("***=> Key: \"");
  for(int i=0; i<32;i++){
    printf("\\x%02X",keyHash[i]);
  }
  printf("\"\n");
 return 1;

}


int generate_materials(unsigned char *inBuff, int len, void *dest, size_t *a4, int a5)
{
  int v5;
  size_t *v7;
  int v9;
  int v10;
  size_t n;
  unsigned char *outBuff;
  int v13;
  int i;
  int v15;


  v9 = len;
  v7 = a4;

  outBuff = (unsigned char*)calloc(0x100,1);
  v13 = find_hash("sha256");
  n = 128;
  v15 = hash_memory(v13, inBuff, v9, outBuff, &n);
  if ( *v7 > n ){
    printf("Error hashing memory\n");
    exit(0);
  }
  memcpy(dest, outBuff, n);
  *v7 = n;
  for ( i = 1; i < a5 && !v15; ++i )
  {
    printf("round %d\n",i);
    v15 = hash_memory(v13, dest, *v7, outBuff, &n);
    memcpy(dest, outBuff, n);
    *v7 = n;
  }
  printf("\n");
  if ( v15 )
    v5 = -1;
  else
    v5 = 0;
  return v5;
}


int usage(char *name)
{
   int x;

   printf("\nUsage: %s -d version cipher('aes') infile outfile chunk_size product(ID)\nSupported products:\n", name);
   for(x=0; seed_table[x].name != NULL; x++) {
      printf("ID: [%d] Description: %s\n",x, seed_table[x].name);
   }
   printf("\n$ ./decrypt -d 4.12.0.p31 aes /file/path/RV50/rootfs.sqfs.uboot /file/path/RV50/rootfs.sqfs.uboot.decrypted 4096 1\n");
   exit(1);
}

void register_algs(void)
{
  if (register_cipher (&aes_desc)){
      printf("Error registering AES\n");
      exit(-1);
   }

  if (register_hash(&sha256_desc) == -1) {
      printf("Error registering SHA256\n");
      exit(-1);
   }
}

int main(int argc, char *argv[])
{
   unsigned char *plaintext,*ciphertext;
   unsigned char *inbuf;
   size_t n, decrypt;
   symmetric_CTR ctr;
   int cipher_idx, hash_idx;
   char *infile, *outfile, *cipher;
   FILE *fdin, *fdout;
   size_t amount;
   unsigned char *cKey;
   unsigned char *cIV;

   if (argc < 7) {
      return usage(argv[0]);
   }

  register_algs();

  inbuf = (unsigned char*)calloc(8192,1);
  cipher  = argv[3];
  infile  = argv[4];
  outfile = argv[5];
  amount = atoi(argv[6]);

   if (!strcmp(argv[1], "-d")) {
      plaintext = (unsigned char*)calloc(8192,1);
      decrypt = 1;
   } else {
      printf("\n[!] decryption only");
      exit(0);
   }

   printf("\n* Sierra Wireless' Airlink Firmware Decrypter (Ruben Santamarta @ IOActive) * \n");

   init_keys( argv[2], strlen(argv[2]), atoi(argv[7]), &cKey, &cIV );


   fdin = fopen(infile,"rb");
   if (fdin == NULL) {
      perror("Can't open input for reading");
      exit(-1);
   }

   fdout = fopen(outfile,"wb");
   if (fdout == NULL) {
      perror("Can't open output for writing");
      exit(-1);
   }

   cipher_idx = find_cipher(cipher);
   if (cipher_idx == -1) {
      printf("Invalid cipher entered on command line.\n");
      exit(-1);
   }


   if (decrypt) {


      if ((errno = ctr_start(cipher_idx,
                              cIV,
                              cKey,
                              32,
                              0,
                              CTR_COUNTER_LITTLE_ENDIAN,&ctr)) != CRYPT_OK) {
         printf("ctr_start error: %s\n",error_to_string(errno));
         exit(-1);
      }


      printf("\n[+] Decrypting firmware to %s...",outfile);

      do {

         n = fread(inbuf,1,amount,fdin);

         if ((errno = ctr_decrypt(inbuf,plaintext,n,&ctr)) != CRYPT_OK) {
            printf("ctr_decrypt error: %s\n", error_to_string(errno));
            exit(-1);
         }

         if (fwrite(plaintext,1,n,fdout) != n) {
            printf("Error writing to file.\n");
            exit(-1);
         }

      } while (n == amount);

      printf("\n[+] Done\n");

   }

   fclose(fdin);
   fclose(fdout);
   return 0;
}
At this point, it is possible to decrypt all of the files, including the filesystem image, so we can start hunting.
Remote Command Injection – Preauth –
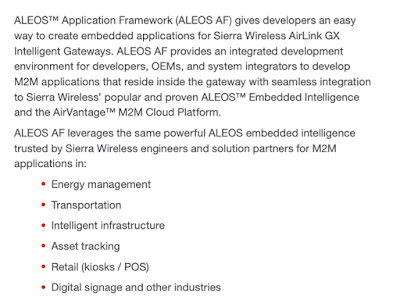
Initial analysis showed that the main web interface looks solid enough after all those killed bugs. I decided to take a look at one of the main features of these AirLink devices: the ALEOS Application Framework (AAF).
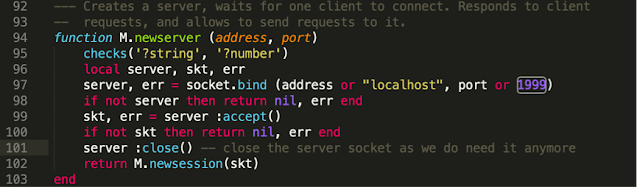
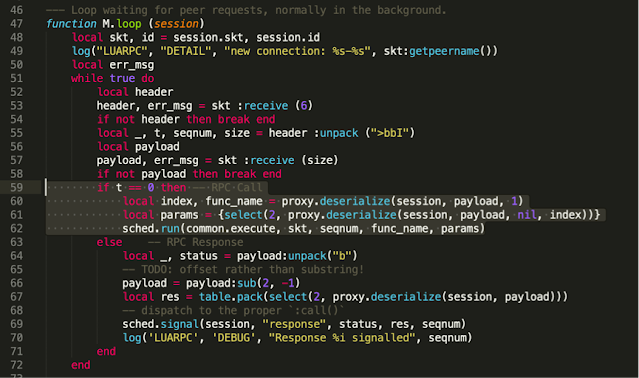
It is worth mentioning that this set of features is not enabled by default, so the administrator needs to enable AAF through the web interface. Once it has been activated, this framework will extend the regular capabilities of these devices, allowing external developers to create their own embedded applications. From the device perspective this has mainly been implemented using LUA, so I decided to take a look at the code (‘/usr/readyagent/lua’ folder). There was something that immediately got my attention: when AAF is enabled, a custom LUA RPC scheduler is exposed at LAN_IP:1999/TCP.
File: ‘/usr/readyagent/lua/rpc/sched.lua’
Following the code, we find that this RPC server deserializes arbitrary function names and arguments, which may be attacker controllable.
File: ‘/usr/readyagent/lua/rpc/sched.lua’
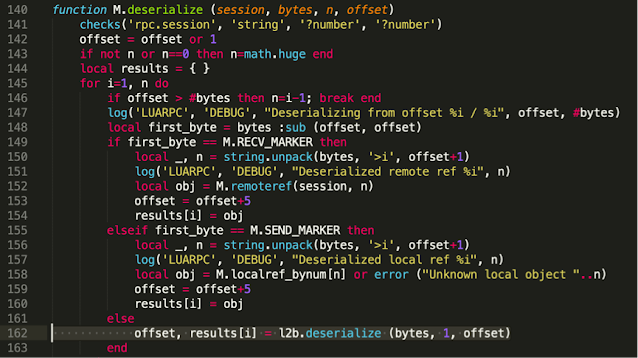
The first request (line 55) receives ‘t’,‘seqnum’ and the number of bytes of serialized data to be received from the client. Then, at line 162, our data will be deserialized using ‘luatobin’ format.
File: ‘/usr/readyagent/lua/rpc/proxy.lua’
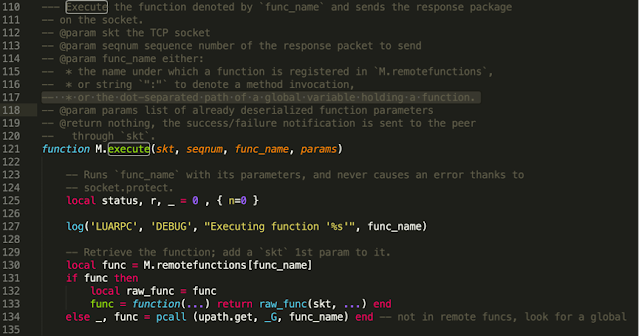
These values will be handled by ‘common.execute,’ which allows any function to be executed.
File: ‘/usr/readyagent/lua/rpc/common.lua’
A malicious actor can leverage this vulnerability to invoke arbitrary LUA functions, such as ‘os.execute’. As a result, an attacker on a network adjacent to an AirLink device (with AAF enabled), will gain the ability to execute arbitrary commands under the privilege of the ‘rauser’ account.
Local Privilege Escalation to Root
At this point I could execute arbitrary commands without requiring any authentication, but ‘rauser’ is still a low-privileged account. The next step was to find a way to escalate privileges to root.
The main web interface is not running as root, but still we can update the firmware, reboot the device, etc., so there should be some logic that allows these ‘root’ operations to be requested from a different privilege level. By reverse engineering the different binaries involved, I eventually found the IPC mechanism: a message queue called ‘/urmG’
File: ‘/lib/libSWIALEOS41.so.1.0’
Any process can access this message queue:
-rw-rw-rw- 1 root 0 80 Sep 9 00:34 urmG
Basically, the root process ‘/usr/sbin/UpdateRebootMgr’ reads a message from this queue that contains the action that has to be performed on the requester’s behalf. Depending on the action, ‘UpdateRebootMgr’ will run the binary in charge of that action, while also passing the command line received from the low-privileged process through the message queue.
For instance, ‘RequestUpdate’ is a binary that sends messages to the ‘UpdateRebootMgr’ root process through the ‘/urmG’ message queue. When ‘UpdateRebootMgr’ processes a certain message, it will invoke ‘FW_UPLOAD_CMD’ using the command line passed in the ‘-o’ argument.
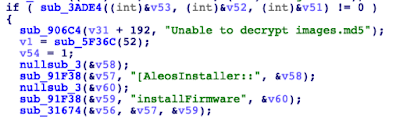
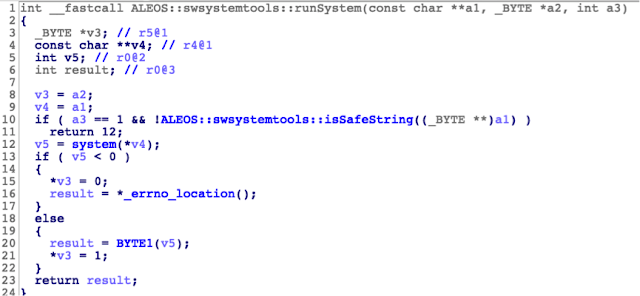
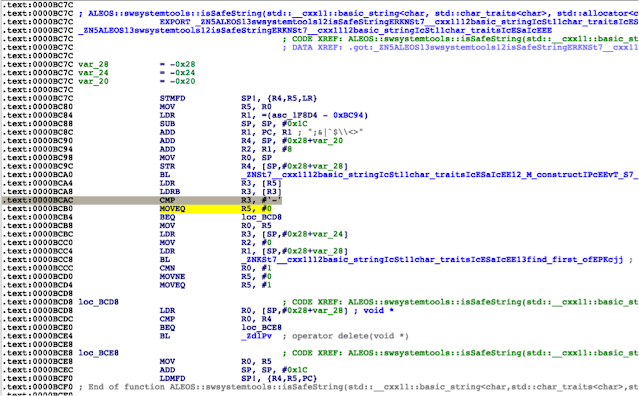
This looks promising. Let’s see what is inside ‘ALEOS:swsystemtools::runSystem.’
File: ‘/lib/libswsystemtools.so’
‘ALEOS::swsystemtools::isSafeString’ looks like the kind of function that should prevent this injection from happening; however, it fails because when the first character is a ‘-‘ it is possible to bypass the ‘find_first_of’ check, which would detect some command injection characters.
As a result, it is possible to perform a classic command injection through the ‘/urmG’ message queue to escalate privileges to root.
This chain of exploits can be used from an adjacent network to get root access without requiring any authentication on any AirLink device that has AAF enabled. This is not the default option, so the attack is mitigated in that sense.
There are some security boundaries these vulnerabilities break in a Sierra Wireless AirLink device:
According to the documentation, the ‘root’ user is proprietary to Sierra Wireless.
The main firmware file is signed and certain key files in the package are encrypted. This attack allows malicious firmware to be installed on the device, thus gaining persistence.
There is an interesting feature, although it is unlikely to be exploited. AirLink customers can temporarily enable a remote support option. This adds a hardcoded root hash to ‘/etc/shadow’ and seems to be identical across devices. A rooted AirLink device might be used to trick Sierra Wireless support staff into remotely connecting to the device to capture the password.
Conclusion
IOActive notified Sierra Wireless about these vulnerabilities in January 2020, which resulted in the following advisories:
—–
Sierra Wireless thanks IOActive for the responsible disclosure of these vulnerabilities.
In current versions of ALEOS, the RPC server is enabled only when the AAF user password is defined.
Sierra Wireless recommends that customers enable the AAF user only for devices that are being used for AAF development and debugging. The AAF user is not required for AAF applications to be deployed and run.
Deployed devices must not have the AAF user password enabled.
Sierra Wireless recommends upgrading to the latest ALEOS version for your gateway. For devices running ALEOS 4.13 today, Sierra Wireless recommends upgrading to ALEOS 4.14.0 once it is available.
We greatly appreciate the collaborative communication with Sierra Wireless during this process.
INSIGHTS, RESEARCH | September 11, 2020
WSL 2.0 dxgkrnl Driver Memory Corruption
By
Joseph Tartaro
The year 2020 has been a disaster of biblical proportions. Old Testament, real wrath of God type stuff. Fire and brimstone coming down from the skies! Rivers and seas boiling! Forty years of darkness, earthquakes, volcanoes, the dead rising from the grave! Human sacrifices, dogs and cats living together…mass hysteria and reporting Linux kernel bugs to Microsoft!? I thought I would write up a quick blog post explaining the following tweet and walk through a memory corruption flaw reported to MSRC that was recently fixed.
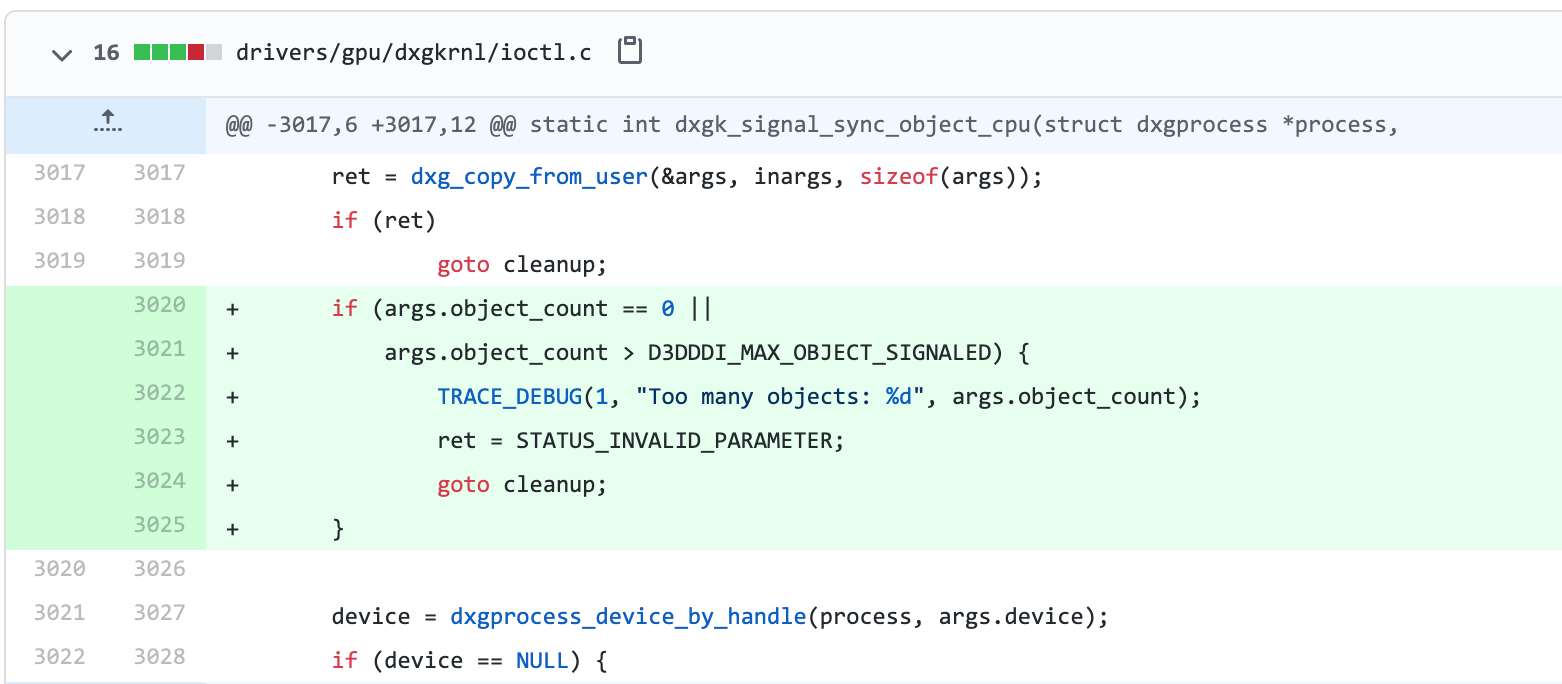
Back in May, before Alex Ionescu briefly disappeared from the Twitter-verse causing a reactionary slew of conspiracy theories, he sent out this tweet calling out the dxgkrnl driver. That evening it was brought to my attention by my buddy Ilja van Sprundel. Ilja has done a lot of driver research over the years, some involving Windows kernel graphics drivers. The announcement of dxgkrnl was exciting and piqued our interest regarding the new attack surface it opens up. So we decided to quickly dive into it and race to find bugs. When examining kernel drivers the first thing I head to are the IOCTL (Input/Output Control) handlers. IOCTL handlers allow users to communicate with the driver via the ioctl syscall. This is a prime attack surface because the driver is going to be handling userland-provided data within kernel space. Looking into drivers/gpu/dxgkrnl/ioctl.c the following function is at the bottom, showing us a full list of the IOCTL handlers that we want to analyze.
When working through this list of functions, I eventually stumbled into dxgk_signal_sync_object_cpu which has immediate red flags. We can see that data is copied from userland into kernel space via dxg_copy_from_user() in the form of the structure d3dkmt_signalsynchronizationobjectfromcpu and the data is passed as various arguments to dxgvmb_send_signal_sync_object().
struct d3dkmt_signalsynchronizationobjectfromcpu {
d3dkmt_handle device;
uint object_count;
d3dkmt_handle *objects;
uint64_t*fence_values;
struct d3dddicb_signalflags flags;
};
staticintdxgk_signal_sync_object_cpu(struct dxgprocess *process,
void*__user inargs)
{
struct d3dkmt_signalsynchronizationobjectfromcpu args;
struct dxgdevice *device =NULL;
struct dxgadapter *adapter =NULL;
int ret =0;
TRACE_FUNC_ENTER(__func__);
ret = dxg_copy_from_user(&args, inargs, sizeof(args)); // User controlled data copied into argsif (ret)
goto cleanup;
device = dxgprocess_device_by_handle(process, args.device);
if (device ==NULL) {
ret = STATUS_INVALID_PARAMETER;
goto cleanup;
}
adapter = device->adapter;
ret = dxgadapter_acquire_lock_shared(adapter);
if (ret) {
adapter =NULL;
goto cleanup;
}
ret = dxgvmb_send_signal_sync_object(process, &adapter->channel, // User controlled data passed as arguments
args.flags, 0, 0, // specific interest args.object_count
args.object_count, args.objects, 0,
NULL, args.object_count,
args.fence_values, NULL,
args.device);
cleanup:if (adapter)
dxgadapter_release_lock_shared(adapter);
if (device)
dxgdevice_release_reference(device);
TRACE_FUNC_EXIT(__func__, ret);
return ret;
}
The IOCTL handler dxgk_signal_sync_object_cpu lacked input validation of user-controlled data. The user passes a d3dkmt_signalsynchronizationobjectfromcpu structure which contains a uint value for object_count. Moving deeper into the code, in dxgvmb_send_signal_sync_object (drivers/gpu/dxgkrnl/dxgvmbus.c), we know that we control the following arguments at this moment and there’s been zero validation:
args.flags (flags)
args.object_count (object_count, fence_count)
args.objects (objects)
args.fence_values (fences)
args.device (device)
An interesting note is that args.object_count is being used for both the object_count and fence_count. Generally a count is used to calculate length, so it’s important to keep an eye out for counts that you control. You’re about to witness some extremely trivial bugs. If you’re inexperienced at auditing C code for vulnerabilities, see how many issues you can spot before reading the explanations below.
This count that we control is used in multiple locations throughout the IOCTL for buffer length calculations without validation. This leads to multiple integer overflows, followed by an allocation that is too short which causes memory corruption.
Integer overflows:
17) Our controlled value object_count is used to calculate object_size
19) Our controlled value fence_count is used to calculate fence_size
21) The final result of cmd_size is calculated using the previous object_size and fence_size values
25) cmd_size could simply overflow from adding the size of d3dkmt_handle if it were large enough
Memory corruption:
27) The result of cmd_size is ultimately used as a length calculation for dxgmem_alloc. As an attacker, we can force this to be very small.
Since our new allocated buffer command can be extremely small, the following execution that writes to it could cause memory corruption.
33-44) These are all writing data to what is pointing at the buffer, and depending on the size we force there’s no guarantee that there is space for the data.
46,59) Eventually execution will lead to two different calls of dxg_copy_from_user. In both cases, it is copying in user-controlled data using the original extremely large size values (remember our object_count was used to calculate both object_size and fence_size).
Hopefully this inspired you to take a peek at other opensource drivers and hunt down security bugs. This issue was reported to MSRC on May 20th, 2020 and resolved on August 26th, 2020 after receiving the severity of Important with an impact of Elevation of Privilege.
You can view the patch commit here with the new added validation.
INSIGHTS, RESEARCH | September 1, 2020
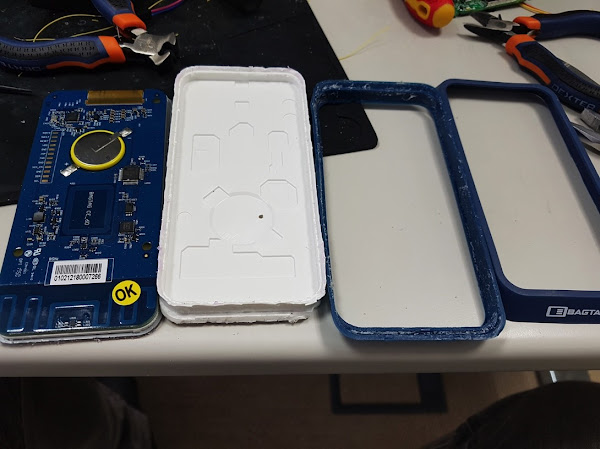
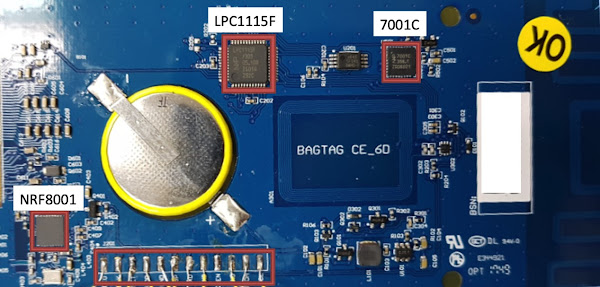
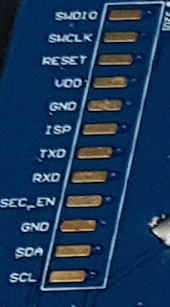
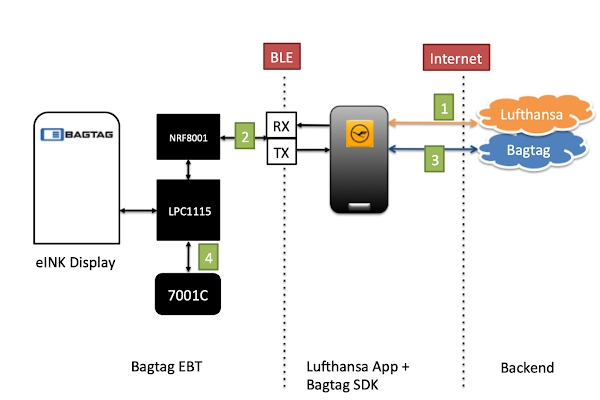
Breaking Electronic Baggage Tags – Lufthansa vs British Airways
By
Ruben Santamarta
If you are reading this article, I will venture to guess that you have already had the ‘pleasure’ of queuing to check a bag at an airport. In order to improve the checking procedure, Electronic Baggage Tag (EBT) solutions are being introduced on the market that leverage the new technologies most travellers have access to nowadays.
This time I will take a look at the security posture of two of the most prominent EBT solutions: British Airways’ TAG and Lufthansa’s BAGTAG.
First of all, IATA provides an implementation guide for these devices, which I recommend you read before continuing on with this blog post, as well as the IATA resolution 753 on baggage tracking.
Certain parts of the implementation guide are worth noting:
In general terms, an EBT solution is comprised of:
Airline mobile app
Airline backend
EBT device
NFC
BLE
Display (e-INK)
The communication channel between airline mobile app and the EBT is established through a BLE interface. Now let’s see how close to the expected functionality of these EBT solutions is to the IATA security requirements.
British Airways’ TAG
British Airways’ (BA’s) TAG is provided by ViewTag. As usual, by looking at the FCCID website, we can find a teardown of the device.
The differences between the teardown version and the one being commercialized are not significant.
It is as simple as it looks. The Nordic SoC is in charge of BLE communication with the mobile app. By reverse engineering the BA app, it was possible to easily figure out how the solution is working: Basically, the BA app directly transfers the data that will be used to update the EBT display via BLE without any additional security.
A custom payload written to the ‘PASS_DATA’ characteristic is the mechanism used to transfer the boarding pass/bag tag data that eventually will be rendered on the EBT device’s e-INK display. The device does not validate either the authenticity or the integrity of the data being transferred. The following code receives the booking information collected from the BA backend and generates the payload:
The payload is a string where the following items are concatenated in a specific order.
passengerName
bookingReference
priority
sequenceNumber
destinationFlightNum
destinationFlightDate (ddHHmm)
destinationAirport
destinationName
firstTransferFlightNum
firstTransferFlightDate
firstTransferAirport
secondTransferFlightNum
secondTransferFlightDate
secondTransferAirport
departureAirport
euDeparture (enable green bars)
fullIdentifier
That’s it, not very interesting I know…
The above diagram sums up the overall implementation:
The BA app downloads the passenger’s booking info and checks the ability to generate a digital bag tag (only available to Executive Club members).
The BA app generates the bag tag payload and transfers it through the PASS_DATA characteristic
The EBT processes this payload and updates the e-INK display with the received information.
As a result of this design, anyone, not only the airline, is able to forge arbitrary bag tags and update the EBT device without any further interaction with BA. Obviously you still require physical access to the EBT device to press the button that will enable the BLE functionality.
The following proof-of-concept can be used to forge arbitrary bag tags and render them on a BA TAG.
File: poc.py
The following is a custom bag tag generated using this PoC:
Lufthansa’s BAGTAG
Lufthansa decided to go with DSTAGS, a company founded by an NXP employee. This company created BAGTAG. I think it is worth mentioning this detail because my analysis revealed that the team behind the device seems to have significant experience with NXP components, although from a security perspective they missed some basic things.
As with the TAG solution, we can access a device teardown on the FCCID site, which is almost identical to the units used during the analysis.
The main components are:
Nordic NRF8001 – BLE SoC
NXP LPC115F – MCU
NXP 7001C – Secure Element
As the following image shows, the Serial Wire Debug (SWD) headers were easily accessible, so that was the first thing to check.
Fortunately, the BAGTAG production units are being commercialized without enforcing any type of Code Read Protection (CRP) scheme in their MCUs. As a result, it was possible to gain complete access to the firmware, as well as to flash a new one (I used a PEmicro Multilink working with the NXP’s MCUxpresso built-in gdb server).
After reverse engineering the firmware (bare metal, no symbols, no strings) and the app, it was clear that this solution was much more complex and solid than BA’s. Basically, the BAGTAG solution implements a chip-to-cloud scheme using the NDA-protected NXP 7001C Secure Element, which contains the cryptographic materials required both to uniquely identify the EBT and to decrypt the responses received from the BAGTAG backend. The MCU communicates with the Lufthansa app through the NRF8001 BLE transceiver.
I came up with the following diagram to help elaborate the main points of interest.
1. The Lufthansa app downloads the passenger’s booking info and checks whether the user wants to generate an EBT.
2. The BAGTAG’s BLE service exposes two characteristics (receiveGUID and transmitGUID) that are basically used to transfer data between the app and the device.
Actually the important data comes encrypted directly from the BAGTAG cloud. In addition to the passthrough channel, there are two publicly supported commands:
The startSessionRequest returns an internal 59-byte ‘ID’ that identifies that specific BAGTAG device. This ID is stored inside the NXP 7001 Secure Element, which communicates with the MCU via I2C using an ISO-7816-compliant protocol.
There are two commands invoked in the firmware for the selected applet:
0x8036: Returns the Session ID and uCode (to generate the IATA’s GUID)
0x8022: Decrypt data (received from the BAGTAG backend through the BLE passthrough)
3. The user needs to register the BAGTAG device and create an account. Then the app serializes the booking info required to generate a valid BAGTAG (pretty much the same fields that were mentioned for BA’s solution) and submits it to the BAGTAG backend to be validated. If everything is correct, the BAGTAG backend returns an encrypted blob that goes through the BLE passthrough channel directly to the BAGTAG device.
4. The MCU receives this encrypted blob and sends it to the 7001C Secure Element to be decrypted. The decrypted data received from the 7001C via I2C is then processed, eventually updating the e-INK display with this information.
It is worth mentioning that I didn’t perform any live tests on the Internet-facing servers to avoid any unexpected behaviors in the production environments.
At the intra-board communication level, the MCU does not implement a secure channel to talk to the NXP 7001C Secure Element. As a result, a malicious component on the I2C bus could provide arbitrary content that will eventually be rendered, as the MCU has no way of validating whether it came from the actual 7001C. Obviously, malicious firmware running in the BAGTAG device may perform the same actions without requiring an external component.
Intra-board attacks (SPI, I2C, etc.) are really interesting in those scenarios where the MCU offloads a specific functionality (network, crypto, radio, etc.) to a certain SoC. If you are into this kind of attacks, stay tuned 😉
For instance, we can see how this lack of intra-board security can also lead to a memory corruption vulnerability in this firmware:
See the issue?
At line 58 ‘transfer_to_i2c’ expects to read v12+2 bytes from the I2C slave, storing them at 0x100011A4. Then at line 63, it is using a byte that may be controlled by an attacker to calculate the number of bytes that will be copied in the memcpy operation. Now, if that byte is 0x00, we will face a wild memcpy corruption scenario.
Conclusions
Lufthansa and British Airways were notified of these issues. Both consider these issues as low-risk threats.
British Airways
“Through our own internal investigations we have validated that there are enough checks in the background that take place to ensure an unauthorised bag would not make it through.
The potential exploitation scenarios are overall really unlikely. The overall risk to the businesses is also considered to be low severity.”
Lufthansa
“From a security standpoint appropriate screening of hold baggage remains by far the most important pillar.
In addition the baggage handling process is robust against many forms of manipulation.
The manipulation by means of EBT is therefore only a supplement to already considered cases and does not mean a significant increase of the attacksurface.
In this respect, there is only a small additional probability of occurrence.
A piece of luggage manipulated via Bluetooth would be identified and transferred to a verification process.
This ensures that no luggage manipulated in this way can get on board of one of our aircrafts.
Lufthansa thanks the researcher for his cooperation.
We will gladly follow up such indications, among other things by means of our BugBounty program.”
I agree, there are serious limitations to turning these issues into a serious attack scenario; however, time will tell how these technologies evolve. Hopefully this kind of research will help to close any security gaps before a more significant attack vector can be discovered.
Infodocument providing a visual exploration into the growing security concerns of smart city technologies. Featuring detail to the myriad technologies, problems, threats, possible targets, as well as current examples of cities having experienced attacks.
INSIGHTS | October 23, 2017
Embedding Defense in Server-side Applications
By
Fernando Arnaboldi
Applications always contain security flaws, which is why we rely on multiple layers of defense. Applications are still struggling with their defenses, even though we go through exhaustive measures of testing and defense layers. Perhaps we should rethink our approach to application defense, with the goal of introducing defensive methods that cause attackers to cease, or induce them to take incorrect actions based on false premises.
There are a variety of products that provide valuable resources when basic, off-the-shelf protection is required or the application source code is not available. However, implementations in native code provide a greater degree of defense that cannot be achieved using third-party solutions. This document aims to:
Enumerate a comprehensive list of current and new defensive techniques.
Multiple defensive techniques have been disclosed in books, papers and tools. This specification collects those techniques and presents new defensive options to fill the opportunity gap that remains open to attackers.
Enumerate methods to identify attack tools before they can access functionalities.
The tools used by attackers identify themselves in several ways. Multiple features of a request can disclose that it is not from a normal user; a tool may abuse security flaws in ways that can help to detect the type of tool an attacker is using, and developers can prepare diversions and traps in advance that the specific tool would trigger automatically.
Disclose how to detect attacker techniques within code.
Certain techniques can identify attacks within the code. Developers may know in advance that certain conditions will only be triggered by attackers, and they can also be prepared for certain unexpected scenarios.
Provide a new defensive approach.
Server-side defense is normally about blocking malicious IP addresses associated to attackers; however, an attacker’s focus can be diverted or modified. Sometimes certain functionalities may be presented to attackers only to better prosecute them if those functionalities are triggered.
Provide these protections for multiple programming languages.
This document will use pseudo code to explain functionalities that can reduce the effectiveness of attackers and expose their actions, and working proof-of-concept code will be released for four programming languages: Java, Python, .NET, and PHP.
Fernando Arnaboldi appeared at Ruxcon to present defensive techniques that can be embedded in server-side applications. The techniques described are included in a specification, along with sample implementations for multiple programming languages.